Water flow slowing down? No water coming out at all?
All it takes is a dirty shower head to completely ruin your shower experience. Whether it’s obviously coated with crusty build-up, or just internally clogged, if there’s enough dirt and grime in or on your shower head, it will affect the flow of water, and over time, it can stop the water completely. If you want to maintain a powerful stream each and every time you take a shower, then you’ll have to take steps to clean your shower head periodically.
Nobody wants to clean any part of the tub or shower, but this job makes a huge difference in how nice your shower feels, and how well it cleans your body. You can always buy a new shower head to fix the problem, but in most cases, you can also just clean the one you have to make it work like new again.
Don’t deal with low water pressure, or holes where no water comes out at all, but don’t run to the store, or call a professional either. Most of us have some of the best cleaning supplies available right at home already.
Check the list below, and discover which technique is best for you to get your shower head clean. You’ll find a list of the top techniques that other people use, and we’ll continue to detail how to get a shower head clean without removing it, or how to do a more thorough job by taking your shower head down.
Why Your Shower Head Is So Dirty
Shower heads can get clogged due to a variety of reasons, and they all get dirty with time. If your water is hard, or from a well, you may have to clean more frequently than someone with soft water, but in time, and despite your best effort to prevent it, the little holes will begin to collect dirt and grime.
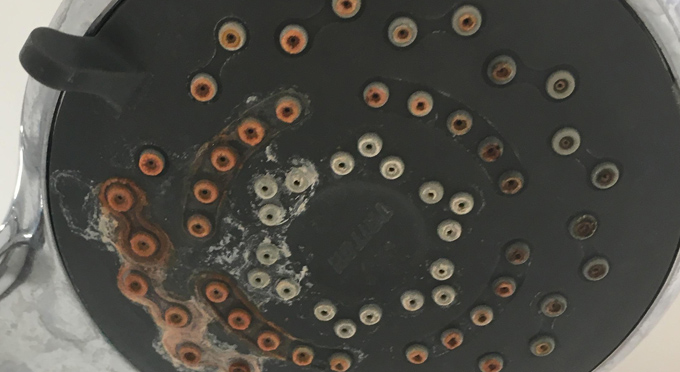
Over time, the surface of the head will become visibly coated, and the holes may start to clog. If you let it go, the collection of contaminates will affect the performance of your shower head, and make it seem like you have water pressure problems. Some of the most common reasons for showerhead clogging include:
Mineral deposits
Hard water contains minerals such as calcium and magnesium that can accumulate on the shower head, and in each opening, over time, forming a white or yellowish crust. This build-up dries rock-hard, and glues itself to the surface. With time, the mineral deposits will layer to become a bigger problem, and they can reduce the flow of water or cause clogging.
Rust Build-Up
If your shower head is made of metal, it can rust over time, especially if it’s exposed to moisture. The little pieces of rust will flake off with the water flow, and then get stuck in weird places. Rust can also cause clogging and affect the quality of the water.
Dirt and Debris
Over time, regular dust, hair, and other debris can accumulate on the shower head, reducing its water flow. Standard dirt mixes in with soap scum and hard water to make thing worse. This extra grime just makes the mineral deposits and rust more difficult to remove, and can lead to a clogged head sooner.
Bacteria and Mold
Shower heads are damp and warm, making them an ideal breeding ground for bacteria and mold. In bathrooms where the shower head gets used less often, this can be a bigger problem because stagnant moisture on the inside will lead to growth of mildew and mold. Although this type of grime is not as likely to block the water flow, it can still slow it pretty easily, and it can also pose a health risk.
Low-Quality Water
If your water supply has impurities or contaminants other than the minerals mentioned above, they can accumulate on the shower head and cause clogging. Although hard water crust is the most common way that shower heads get clogged, there is all sorts of other stuff inside tap water that can build up over time to cause problems.
Lucky for you, this problem can be easily fixed. There are several home remedies and DIY techniques to get this job done, and a few of them are very effective. If you take steps to clean your shower head occasionally, it’ll stay in top condition for a long time, and you’ll never have to worry about the water stopping, slowing, or spraying in the wrong direction.
Top 5 Shower Head Cleaning Methods
Shower heads are essential fixtures in any bathroom, but they can accumulate dirt and mineral deposits over time, causing low water pressure or even clogging. Cleaning a dirty shower head is necessary to ensure optimal performance and prevent the growth of harmful bacteria. Here are the top 5 ways to clean a dirty shower head:
1. Use a Vinegar Soak
One of the easiest and most effective ways to clean a dirty shower head is by using regular, distilled white vinegar. This common household product works well to break down hard water and soap scum build-up when used correctly. It’s a mild acid that is safe for use on plastic or metal, and it poses no risk of harm to you, or damage to the head.
Even though it isn’t a powerful, toxic chemical, vinegar can be effective at removing what seems impossible to clean. You won’t need any sponges or brushes to complete the task because with this method, you only need to let the shower head soak in the vinegar.
How To Do It:
No scrubbing will be required. Just let it pickle, and the crusty stuff will loosen and lift off the surface of your shower head.
- To try this technique, you’ll need to submerge the showerhead.
- To prepare, either remove the head, or set up a solution to let it soak in place.
- Use a straight vinegar solution, or dilute with some water.
- To clean, just submerge.
- Simply leave it to soak overnight, then remove the head from the solution and rinse.
- To finish, just turn on the shower to flush out any remaining vinegar or debris.
The acid in the vinegar will dissolve the mineral deposits and dirt coating the surface, and it will loosen and remove any chunks clogging the holes. Once you give it a final rinse and wipe, you’ll be surprised at how clean this simple and natural technique got your shower head. It’ll be sparkling clean.
2. Use Baking Soda and Vinegar Together
If your shower head has a lot of buildup, a baking soda and vinegar solution may be more effective due to the increased scrubbing power, and reaction between the two ingredients. With the addition of baking soda, the solution is able to penetrate better, and clean more thoroughly in some cases.
How To Do It:
- To try this techniques, just mix equal parts baking soda and vinegar to create a homemade cleaning solution.
- To clean the head, simply submerge it in this solution, and then let it sit.
- The vinegar and baking soda will do the cleaning while you wait.
- After it sits for an hour or more, take it out of the solution and rinse it thoroughly.
- To finish, run water through it to flush out any remaining residue.
Just like with the straight vinegar method, the natural liquid will do the bulk of the cleaning because the acids will break down the buildup. With the added bubbling action and abrasive scrubbing power, the addition of baking soda can be a better home remedy for more stubborn grime. If you try vinegar alone without good results, try this combo solution instead and it might do a better job.
3. Use Lemon Juice
Lemon juice is a natural acid that can effectively remove mineral deposits and dirt from shower heads. When you apply the mild acid to the grime covering your shower head, it will begin to break it down, and dissolve it. You can use some lemon juice from a bottle, or you can cut a fresh lemon in half and rub the flesh all over the shower head, making sure to cover all the surfaces.
How To Do It:
- To try this method, first prepare your solution.
- Once prepared, apply it to the surface directly, or by spraying.
- Once you get the shower head coated with lemon juice, leave it to sit for 30 minutes.
- Once the lemon juice sits for a while rinse the area with water.
This method may only remove one layer of dirt and grime at a time, so if the head still looks dirty after rinsing, apply another coat of lemon juice and repeat the process. The citric acid in lemon juice not only cleans but also leaves your shower head smelling fresh.
4. Use Toothbrush Scrub
For shower heads with hard-to-reach areas, a toothbrush can be used to scrub away dirt and mineral deposits. You definitely won’t want to put it in your mouth afterward, so make sure to use an old toothbrush, or a similar small brush that is meant for cleaning. The small head and sturdy bristles make the perfect tool for scrubbing inside the little holes, and into other hard-to-reach places.
How To Do It:
- To use a brush effectively, you’ll want to pair it with some kind of cleaning solution for best results.
- Mix a solution of equal parts water and vinegar in a bowl, then dip a toothbrush in the solution and scrub the showerhead all over.
- You can also add some baking soda for more scrubbing power.
- Use a different cleaner that works for hard water if you prefer.
- Scrub carefully, making sure to get into the holes, but also avoid damage and scratching.
- Once the shower head looks clean, simply rinse with water.
- If any dirt or grime remain, you should repeat the process until the shower head is clean.
This technique combines a simple home remedy natural cleaner with added scrubbing power. The crusty stuff that collects on shower heads can be difficult to remove, so using a safe and effective scrub brush can do the trick when other options fail.
5. Use a Store Bought Cleaner
If none of the above methods work, you can try using a commercial cleaner specifically designed for shower heads. You should follow the instructions on the package carefully, and make sure to wear gloves and ventilate the area to avoid any harmful fumes. Results with cleansers on the shelf at your local store can vary widely, but some people find that some of these more dangerous, and chemical-filled options are the only thing that will work.
How To Do It:
- To try any cleaning product you find at the store, read the container and follow the instructions provided.
- In most cases, you’ll spray them on, and then scrub, and then rinse.
- Take care with the ingredients, and make sure to use gloves and proper ventilation.
We would definitely recommend trying one of the more simple, safe and cost effective options above first, but if all else fails, you may want to head to the store for a bottle of cleanser before you think about replacing your shower head.
Clean Your Shower Head Without Removing It
Most people avoid this job because they think you have to remove the head to clean it. With just a few extra items, you can avoid this step and make the job way easier. Instead of soaking the head in a bowl or bucket after you uninstall or remove it, simply use a plastic bag to soak it right where it is.
Just get a plastic bag that is big enough to fit around your shower head, and allow for enough vinegar to submerge it. A gallon size storage bag is usually good. Once you have a large enough plastic bag and some vinegar, just grab a rubber band and then follow the simple steps below:
- To begin, slip the rubber band over your shower head, and slide it up the neck and out of the way. Depending on the size of the rubber band, you may need to double or triple it up to make it tight against the pipe.
- You want it tight enough to hold the filled bag, but not so tight that you can’t slip the edge of the bag underneath after you fill it.
- Fill the plastic bag most-of-the-way with distilled white vinegar. Hold it up and test to make sure the head submerges, and add more, or remove as necessary.
- Once the bag is properly filled, secure it in place by slipping the top edge of the bag underneath the rubber band.
- Allow the head to sit for at least an hour, and up to overnight. After it sits, remove the bag and rubber band, then rinse it off and run the water to flush it out.
- Repeat the process if necessary to remove all build-up, then finish by polishing with a soft cloth.
Take Your Shower Head Down For a Thorough Cleaning
A vinegar soak usually does the trick to clean most shower heads, but in some cases the mineral deposits and debris build-up will be more than it can handle. If you’ve already tried cleaning your shower head without removing it, but it’s still dirty and clogged, then you’ll need to take it down to get it in working condition again. Follow the simple steps below to do a more thorough job, and you’ll be sure to have the water flowing at high speed again.
- It may seem difficult to remove your shower head, but it’s actually a simple job that anyone can do. The most difficult part is to take care and avoid damaging the finish of your fixture or plumbing.
- Make sure to use a use a wrench rather than pliers, and you may want to pad the surface with a rag to avoid scratching or leaving marks.
- To take the head off, just twist to the left using your wrench, then continue rotating until it’s removed.
- Once the head is off, rinse it under the faucet to remove any loose debris and get it out of the way.
- For any areas with hard water deposits and other grime, give them a scrub with a toothbrush and some vinegar.
- Use a toothpick, paperclip or something similar to poke out any deposits in the little holes, or for heads with rubber or silicone openings, manipulate and rub the openings to loosen and remove anything blocking the water.
- Fill a bowl or bucket with vinegar, then soak the whole head for an hour. Completely cover the head, and then let it sit.
- To increase the cleaning power, you can also add a scoop or two of baking soda to the mixture.
- After soaking, rinse thoroughly.
- Once clean, reinstall the showerhead and test for performance. Make sure to replace any plumbing tape with fresh tape, and make sure to protect the fixture and use the proper tool, just like you did while taking the head off.
- Twist the head in place tightly, then turn the water on to test functionality.
How To Prevent Future Build-Up
It’s essential to clean your shower head regularly to prevent clogging and maintain good function. Using the right cleaning method can help remove the buildup and restore your shower head’s performance, but preventing the clogging is way easier than dealing with it after it has occurred. Here are some simple steps you can take to prevent clogging in the first place:
- Install a water softener: If you live in an area with hard water, consider installing a water softener. A water softener removes the minerals that cause buildup and clogging in shower heads.
- Use a shower head filter: An inline filter can also help prevent clogging by removing impurities and contaminants from the water, but this kind is much easier to install.
- Clean your shower head regularly: Regular cleaning can prevent the buildup of mineral deposits, dirt, and bacteria that cause clogging. Use one of the cleaning methods mentioned above at least once a month or as needed based on performance or look.
- Use a high-quality shower head: A high-quality head with a good filter can help prevent clogging and improve water flow. Look for models with removable filters that are easy to clean.
- Avoid using harsh chemicals: Harsh chemicals can damage the shower head and actually cause clogging. Instead, use natural cleaning solutions like vinegar, lemon juice, or baking soda.
- Avoid leaving wet towels or washcloths on it: Wet towels or washcloths left hanging to dry can promote the growth of bacteria and mold, and that can lead to clogging or affect your health.
Stop dealing with the low volume of water trickling from your shower, but don’t work too hard either.
You can easily get your shower head clean and the water flowing swiftly by using one of the top 5 methods listed above. Intense scrubbing and harsh chemicals are not required to do this job properly, and will only be necessary in extreme situations. For most people, and simple DIY home remedy will be the best way to remove clogs and get their shower head clean.
You won’t need professional help, and in most cases, you won’t have to buy anything either. Give it a shot by thoroughly cleaning with a simple soak, or for for tough jobs, uninstall the head to deep clean every part.
Bonus Tips
- Be careful what type of brush you use. If the bristles are too stiff you run the risk of damage to the finish of your fixture, so make sure to use one that’s tough enough to clean the grime, but gentle enough to avoid damage.
- Avoid using bleach. It won’t be effective at removing the grime, and it’s also stinky and easy to have an accident with. Bleach may even lead to increased bacteria growth over time.
- Periodic maintenance cleaning is best. Avoid tough jobs or long soaks by keeping your shower head clean at all times. You can make a vinegar spray diluted with water to spray and wipe the head every week, and no crust will ever form.
- Ventilation is key. If you do have to resort to a bottle on a shelf at the store, you can be pretty sure it will have a strong smell and toxic fumes. Make sure to crack a window and work in a well ventilated space to avoid any side effects of breathing in the fumes.
Tip Contents
- Why So Dirty
- Top 5 Cleaning Methods
- Clean a Shower Head Without Removing It
- A Thorough Cleaning
- Prevent Future Buildup
- Bonus Tips


 Ordering Info
 Customer Service
 Follow Us
 Search For Stuff
 Find Us
 Call Us
 Pay Us
0 Comments so far.
Use the form below to add your own thoughts or questions. Scroll down to read what other people had to say.