MMMM…Grease…
It sure does make food taste great, but over time, the oils and fats used while cooking slowly coat the surfaces in your kitchen to make them look grimy. When wood cabinets get covered over time, the result is a brown or yellow film that’s sticky to the touch, and incredibly difficult to remove. Using the wrong stuff could leave all residue intact, or worse yet, lead to removal of the finish, or other damage to the material. It doesn’t matter if your cabinetry is stained or painted, using the tips and techniques below will help you eliminate the grime, and make your kitchen cabinets look great again. Continue reading to see the top recommendations for this job, but also learn how to save time and effort by using our simply good method instead.
More than just a concern for your waistline, the butter simmering in that pan, or the oil used to fry that chicken will not only build up on your thighs and butt, they’ll also build up on surfaces near your range. Kitchen cabinets and hardware are notorious locations to find this annoying mess, and many people are unaware of the best way to clean it. You could wipe down every surface after each meal is prepared, and that would guarantee that nothing builds up in the first place, but few of us are that disciplined. When left in place, and allowed to accumulate, this gooey grime can glue itself in place to make an ugly mess that will no longer wipe right off. When this becomes the case, you’ll have to take more drastic steps to remove it because it’s usually months or years of layering that has to be removed in order to get rid of the dull and dingy look.
Be Careful
When looking at wood cabinets commonly found in kitchens, there are generally two types. The material is either solid wood or a composite, and the finish is either stained or painted. Regardless of the exact combination you’re dealing with you’ll want to be careful in order to avoid ruining the surface. If you scrub too hard, or use the wrong cleaner or tool, you can easily remove the paint or stain along with the grease. For composite cabinets specifically, you’ll want to make sure to avoid excess moisture, or moisture that lingers because the material can easily absorb the liquid and swell as a result. Also, commonly used cleaning and conditioning substances may be flammable, and thus they should be avoided due to proximity to intense heat and open flame.
Why It’s So Tough
The greasy buildup is sticky all by itself, but when it remains glued in place, and when it’s allowed to layer up over time, dust, lint and other more substantial dirt can mix in to create a thick, gooey coating that attracts more and more grime. It’ll never wipe off, and due to the delicate surface underneath, you’ll need to avoid harsh chemicals or abrasive tools when trying to remove it. If you try the wrong thing, the results can be devastating, and even when choosing a safe and effective technique, you could find yourself spending an incredible amount of time to finish the job.
Top 4 Cleaning Techniques
When searching the internets, there are only a handful of recommended methods for removing grease and oil residue from wood cabinets. To make it easy on you, we will list the top four below, along with detailed instructions on how to try them. The first few are basically home remedies, so they will allow you to try stuff you probably have at home already. The last one is regularly viewed as the most effective, but it also requires you to buy a special product, specific for this job. Luckily, one product is almost unanimously recognized as the best, and all others seem to fall short when compared for effectiveness. In our opinion, the simply good method that follows will offer the easiest way to achieve outstanding results, and it’s guaranteed to be safe and effective in any situation.
General Cleaning Instructions
Stuff You’ll Need
- Cleanser of choice
- Cleaning cloth
- Toothbrush or other small brush
How To Do It
The recommended methods that follow all require the same basic cleaning technique, and are really just different cleansers that you either make or purchase. The first step will be to decide upon, and make if necessary, your cleaner of choice, and then you can proceed. Use the basic steps below to ensure every surface gets clean, and look below to decide which of the top 4 cleansers you want to try.
- Prepare The Surface – To get ready for the main cleaning, you will save time by pre-treating any tough stains, or areas of intense buildup. To do this, try using a toothbrush or other small cleaning brush. Just get it damp, and scrub gently to loosen the stubborn grime.
- Fronts and Sides – Once all the stubborn spots are loosened, and the tough grime has been pretreated, you can begin cleaning the doors and exposed sides. Make sure to do one at a time, and work from top to bottom to avoid missing any spots. Simply apply your cleaner, then wipe with a high quality cleaning cloth.
- Handles and Hinges – It may be more difficult to notice on hardware, but the same type of buildup is occurring there also. In fact, it can often be worse due to the addition of dirt and oils transferred from hands using the cabinet doors. Make sure to scrub hardware, and get in and around all cracks and crevices. With certain types of cabinetry, the intricate facing may make this step more difficult, but also more necessary.
- Don’t Forget The Inside – When cleaning the exterior, it’s the perfect time to remove all of the stuff inside your cabinets to clean the interior too. Once the stuff is removed, you can wipe down shelving, clean the inner facing portion of doors and drawers, replace worn liner, and spot clean any larger stains and drips.
- Long Lasting Clean – When all of the dirt is removed, apply a wax or polish as a protective covering to prevent future buildup. The surface will not only look better right away, it will also stay clean longer. Add a coating of drying oil(lemon, tung, wood oil, etc.) a few times per year in order to preserve oak, pine, maple and other natural cabinets.
- Preventative Maintenance – If you’d like to avoid major cleanings, try a once weekly wipe down to quickly remove the grime before it builds up. Just use a damp microfiber cloth to lift off 99% of the accumulated gunk, and the dark haze will never form.
- Redirect The Funk – Use your hood vent to suck up grease-filled air, and direct it out of the kitchen. Modern fans can move a large amount of oil-soaked air, and most also have integrated filters to clean and circulate dirty air. When the grease is removed or directed out of your home, it will never have a chance to settle on walls and cabinetry.
- Protection – Depending on the ingredients in the cleaner you use, you may want to wear rubber gloves to protect your skin.
1. Vinegar
You’ll need to use the white, distilled variety, but most of us have it on hand already because it’s a popular natural cleaning ingredient, and it has many valuable uses. For this job, it can help to loosen the sticky grease, so that you can wipe off the gross residue coating your cabinets. For this job, you’ll want to use the vinegar full strength, so apply it undiluted to the affected area. You can spray it on, or dampen a cloth to wipe it in place, but once the area is coated, let it sit for a moment before removing it. The vinegar will dissolve the greasy residue to loosen it, and release its bond with the wood surface. You may need to apply multiple applications to completely clean the surface because each application will only be able to remove a single layer of grease. If you apply the vinegar, and wipe the surface clean, but grime still remains, apply another coating of vinegar, and begin the process again. In severe cases, multiple applications will help you achieve a spotless surface.
2. Dish Soap
Regular dish washing detergent is a powerful grease cutter, so it’s widely recommended for this job. Hot water is also useful in loosening this sticky mess, so when you use hot water and soap together, it can be a powerful combination. To use this method, plug your kitchen sink or use a large bucket, and then fill with hot water. Add in about 2 tablespoons of dish soap and mix to combine. Although this mixture will loosen the residue on its own, you’ll want to use a scrubby sponge orc scouring pad in order to cut through any thick buildup. Simply dip your sponge into the soapy water to saturate with cleaning liquid, then apply to the surface of your cabinets. Use the abrasive side to break through the yucky brown stuff, and help to lift up any stuck on goo, but make sure to remain gentle so you don’t harm the finish on your cabinets.
3. Oil And Baking Soda
Combine one part vegetable oil with two parts baking soda to create a powerful, homemade cleaning paste. The oil will help to loosen the sticky goo, and the baking soda will act as a gentle abrasive to scrub loose any extra stubborn grease. To use this method, take a clean cloth and apply the paste to all surfaces, including hardware and hinges. After using the paste to get rid of the greasy residue, you’ll need to use soap and water to finish the cleaning process. Wash all surfaces to eliminate any residual oil, and also lift off any remaining dirt.
4. Store Bought Products
There are many cleaners available for sale at local stores, and there would be several choices applicable to this job. Many people seem to have good results with various all purpose cleaners, but the winner in overall effectiveness is Murphy’s Oil Soap. It does have a strong chemical smell, so it may be harsh to those sensitive to different chemicals, but it also seems to work well for most people. If you have painted cabinets, you’ll have to dilute it first, but once you have the correct mixture, you pretty much just spray it on, and wipe it off. The citrus-y ingredients work well to cut through greasy grime, and the oily soap helps to lift it ups, and let it slide off the surface. Just spray or wipe to apply the cleaner, then wipe the treated areas to remove the dingy film. As an added bonus, this remarkable cleaner also seems to condition the wood in order to leave it looking silky and smooth.
 The Safe And Easy Way To Clean Greasy Cabinets
Store bought products are useful, and home remedies are nice, but when you have really dirty cabinets, neither will be up to the task. In the example that follows, we will quickly, and effortlessly remove decades of grime from natural wood cabinets. This particular surface had been neglected for years, so loads and loads of grease, oil and other grime were allowed to accumulate over time.
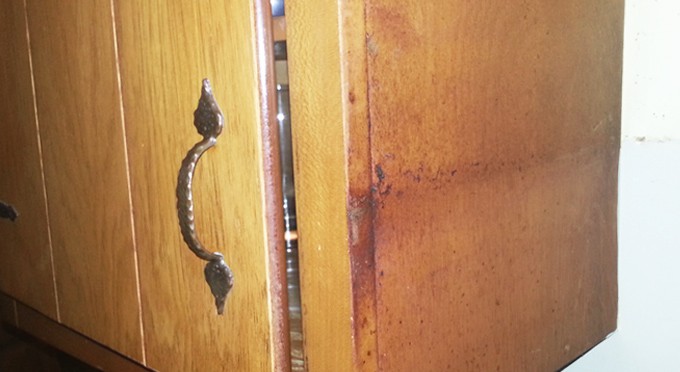
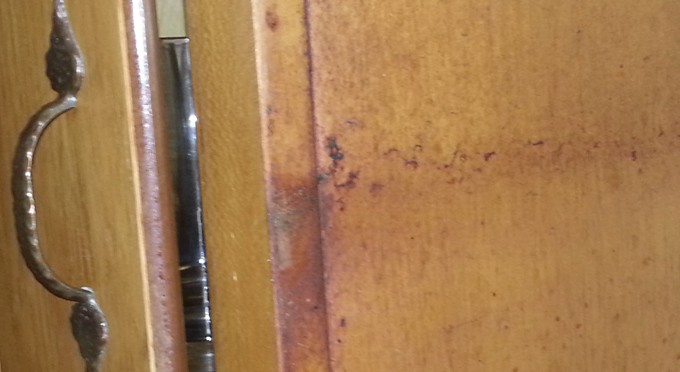
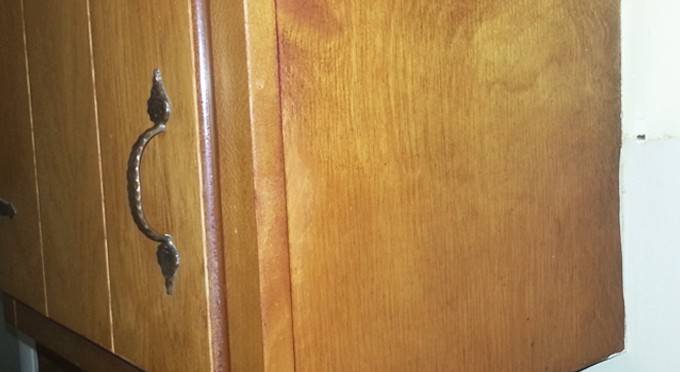
A few years of not cleaning will make the surface dull and sticky. A few more will cause it to darken. When neglected for even more time, the gooey dirt will begin to pile and cover the wood completely. If you take a look at the picture above, you can see dark staining that looks thick and sticky. It is incredibly gross to look at, it has a stinky odor to it, and believe it or not, this is what the surface looked like after it was already “cleaned”.
This particular cabinet is an upper one located right next to the stove, and the area in view is the side, after an old hood fan had been removed. If you look closely, you can see a dark line of stain that outlines the base of the fan that used to be there. The lower half is totally coated in a brown haze, and the upper half, although cleaner, is also quite dingy. The old fan was easily thirty years old, and it was probably as long, or longer, since the wood surface was thoroughly cleaned. Before installing the new hood, we proceeded to rejuvenate the surface, and remove every spec of residue collected.
Stuff You’ll Need
- Damp terry cloth towel
- Dry Terry cloth towel
- Quick N Brite Cleaner
The method below will allow you to clean any cabinet in a record amount of time. It could be covered with years of dirt like the example pictured, or it could be a more simple situation involving months, or a single year of buildup. When you use the cleaner mentioned, and apply it with the method outlined, you can guarantee results, and also ensure that there is no risk of damage. It won’t ever ruin the wood, or remove the paint or the stain, and because there’s no harsh chemicals, you don’t have to worry about it irritating your skin, harming your lungs, or causing a fire.
 Step 1.
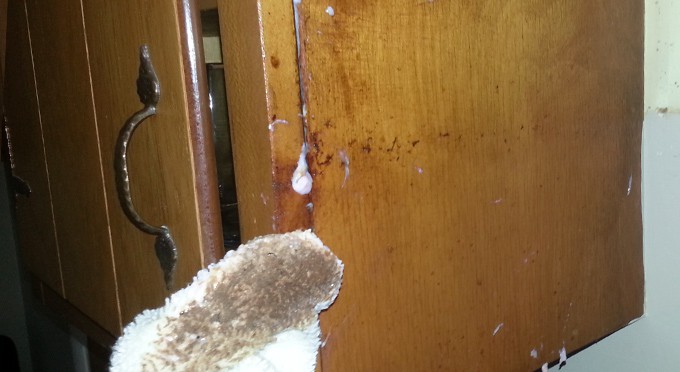
Use a damp towel, and pick up a liberal amount of cleaner. Apply it to the surface like you are waxing a car by using a circular motion. The dirt and grime will immediately begin lifting off the surface, and it will transfer right to the towel. Take a look at the image above, and notice the towel that looks to be covered in mud. This is actually the same stubborn grease and oil residue that seemed impossible to remove. When the cleaner is applied, it immediately begins work by breaking down the organic stain, and releasing its bond with the wood below. Once loose, it easily wipes free to collect on the towel.
In this case, most of the residue came off by just applying the cleaner, but in order to free the really stubborn stuff, you’ll want to let the cleaner sit for about 10 minutes.
Step 2.
After you let the cleaner sit, use a clean, dry towel to remove it, and wipe away all of the loose dirt and grime. In this case, after wiping, the cabinet was pretty darn clean, but the most sticky dirt still remained. The wood already looks lighter and more vibrant due to the yucky haze being wiped away, but the thickest and most sticky spots still remained to make the cabinet look dirty.

Step 3.
After the initial cleaning, if there is still grease and oil that remain in place, just do a second application to leave the wood completely clean. Use a damp cloth again, and apply the same amount of cleaner in the same fashion. You’ll notice that the towel looks much cleaner with this application, but there is still obvious dirt that is lifting off the surface. Spread the cleaner around to cover the whole surface, and then let it sit again to allow it time to work. While it sits, the cleaner will break down the remaining stains so that they will now wipe free.
 Step 4.
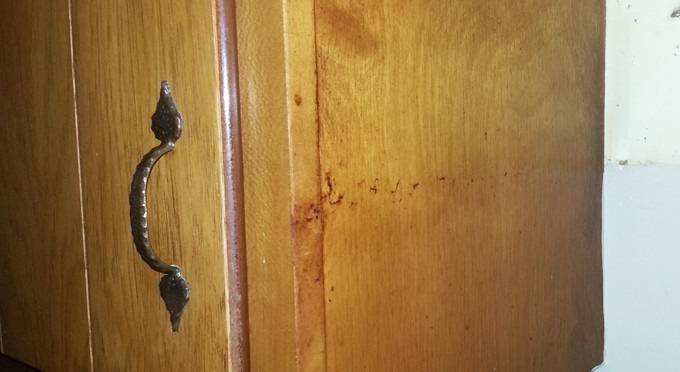
After the cleaner has time to work, take your dry cloth again, and wipe the surface clean. This time, those last few stubborn spots will wipe clean, and there will be absolutely no haze or discoloration left. The surface will no longer be sticky to the touch, or dull to look at, and the natural beauty of the wood will be revealed again.

Prior to cleaning, the natural wood surface was dark and dingy, and it was covered in a sticky goo that was like a magnet for new dirt. This particular mess was several decades in the making, but it only took a matter of minutes to eliminate. After the cleaning was complete, the wood looked lighter and more colorful, and it was smooth to the touch. The before and after picture above shows the drastic difference, and this simple job made a real improvement to the kitchen.
Quickly remove greasy buildup from wood surfaces, and never worry about how well it will work, or what damage it might do. The simply good method above will work in every situation, and it is safe for every type of cabinet. You won’t have to make the cleaner yourself, you won’t have to risk removing the paint or stain, and you’ll always have incredible results. If your cabinets look as awful as the one in the example above, it may take two applications, but for most folks, a single application will completely clean, condition and rejuvenate their cabinets.
Don’t go another day looking at that darkened surface, and stop dealing with dirty surfaces where you prepare food. That sticky, dirty mess will only get worse with time, so tackle it now to reveal a vibrant surface that is resistant to new dirt. Once the surface looks like new again, you can apply a wax or polish to repel new grease, and keep the surface looking bright and clean longer.
Products Mentioned
- Quick N Brite Cleaner – Buy some or find out more.
- High Quality Cleaning Cloths – Buy some or find out more.
- Terry Cloth Towels
- Murphy’s Oil Soap


 Ordering Info
 Customer Service
 Follow Us
 Search For Stuff
 Find Us
 Call Us
 Pay Us
Thanks for your comment about how you should be cautious when scrubbing super hard to get rid of grease. I didn’t know that if you’re not careful, you could remove the paint from your surface. My mother is helping out her friend with cleaning an elementary school’s cafeteria and is considering looking into grease removal service for help.
Yep. The finish on wood cabinetry is actually pretty delicate, and prone to damage if you’re not careful. Although calling in the professionals will probably eliminate the risk, it’s not in everyone’s budget. Luckily, a careful, DIY approach can also produce professional looking results.
I had no idea that vegetable oil and baking soda could be used to clean cabinets, but this is really good to know as mine are messy. My kids are always getting their messy hands all over my kitchen and some of whatever was on their hands got on my cabinets. However, do you think I could use coconut oil instead of vegetable oil?
Kids these days…. SMH. No telling what’s all over those grubby mitts, but to answer your question, yes, you can substitute coconut oil when trying this method.
It’s interesting that you talked about using dish washing detergent to help break down grease. I have been wanting to get wood cabinets installed in my kitchen but I don’t know how to clean them. I can see how it would be nice to use dish soap. That way, I won’t have to worry if my kids wipe grease on the new cabinets.
I think that you might be a little bit better off with plain old parchment paper or even plain paper towels simply because when the grease and humidity kick in, the newsprint will transfer to the cabinet.
That is a good point you made about the time and effort it takes to clean off greasy cabinets. If you try something that doesn’t work, it can be really discouraging! Then again, that is why it is so important to stay on top of cleaning your cabinets to preserve and make them last!