 [4]Home improvement projects are great. Forgetting to change into your work clothes? Not so great.
When clumsy people and wet paint are in the same vicinity, accidents are almost guaranteed. It’s almost like there is some sort of invisible attraction between super stain-y things and clothing, especially white clothing. This being the case, and because someone was too impulsive or cool to change prior to starting work, that someone ended up with a good amount of fresh paint on their favorite shirt.
Most people would probably consider the shirt ruined at this point. Others may attempt a cleaning only to spread and smear the paint, making things worse. This particular paint is no joke, so either result would make perfect sense. Thick, dark, and intended for commercial applications, most cleaners and techniques would not even begin to work.
The paint that created this stain was very far from a child’s art supply, or something that would wash off easily, so if left on the clothing, it would have created a permanent stain that would be impossible to get clean. Because we ran to the sink within a few minutes of noticing it, the paint was pretty easy to remove, and we were able to clean it completely, with no trace left after finishing.
We didn’t use a stain stick, or some colorful liquid spot remover. We also didn’t waste any money or effort trying to find something at the store that would do the job. No off-the-shelf cleaner will ever remove a paint stain from clothing without intense effort and luck, and most would probably bleach or otherwise ruin the fabric in the process.
Common Way To Clean A Paint Stain On Clothing
If you ask around, most experts will provide similar advice for this job. A paint stain is a difficult mess to clean, but if you take care, and use stuff you have at home, you may be able to remove the stain and save the shirt. For best results with a paint stain, you’ll always want to get to work right away, so use the method below to attempt removal with cleaning supplies you already have.
If you’d prefer to clean with a proven technique that’s easy to use, and guaranteed to work continue reading for an easier way to remove the stain. You will have to buy something new, but you’ll also get to wear your shirt again.
Removing blue paint from a white shirt can be a bit challenging, but with the right approach, you can often salvage your shirt. Here are some steps to help you remove blue paint stains:
Materials You’ll Need:
- Butter knife or spoon (for scraping)
- Blotting paper or paper towels
- Liquid dish soap
- Rubbing alcohol (isopropyl alcohol)
- Cotton balls or a clean cloth
- Old toothbrush
- Stain remover (optional)
Instructions:
- Act Quickly:
- The sooner you address the paint stain, the better your chances of success. Try to treat the stain as soon as possible.
- Scrape off Excess Paint:
- If there’s any excess wet paint on the shirt, use a butter knife or spoon to gently scrape it off. Be careful not to spread the paint further.
- Blot the Stain:
- Place a piece of blotting paper or several paper towels underneath the stained area. This will help absorb some of the paint as you work on it.
- Pre-Treat with Dish Soap:
- Apply a small amount of liquid dish soap directly to the stain. Gently rub the fabric together to work the soap into the paint.
- Rinse and Blot:
- Rinse the stained area under cold running water. Be sure to rinse from the back of the stain to push the paint out of the fabric, not further into it. Blot the stain with paper towels to remove as much paint as possible.
- Apply Rubbing Alcohol:
- Dampen a cotton ball or clean cloth with rubbing alcohol (isopropyl alcohol) and gently blot the paint stain. Be careful not to scrub too vigorously, as this can damage the fabric. Continue blotting until you see the paint transferring onto the cotton ball or cloth.
- Rinse Again:
- Rinse the stained area under cold running water to remove any remaining paint and alcohol.
- Check the Stain:
- Examine the stain to see if it’s completely gone. If any residue remains, repeat the process until the stain is gone. You can also use a stain remover at this stage if you have one on hand, following the product’s instructions.
- Wash the Shirt:
- Launder the shirt as you normally would, but avoid using hot water as it can set the stain. Use cold water and a mild detergent. Check the stain again after washing but before drying. If it’s still visible, avoid drying the shirt, as heat can set the stain.
- Repeat as Necessary:
- If the stain persists after washing, repeat the steps until it’s completely gone. Be patient, as it may take a few attempts.
Remember that different types of paint (acrylic, oil-based, watercolor, etc.) may require slightly different methods. Additionally, always check the care label on your shirt for specific washing instructions. If the paint stain is particularly stubborn or if the shirt is valuable, you might want to consider professional dry cleaning.
Additional Tips:
- If there’s any excess wet paint on the fabric, gently scrape it off using a butter knife or spoon. Avoid spreading the paint further. For dried paint, skip this step.
- When blotting or rubbing the stain, always work from the outside of the stain toward the center to prevent spreading.
- Use a soft, clean cloth or cotton balls for blotting. Avoid scrubbing too vigorously, as it can damage the fabric fibers.
- Be patient and persistent. You may need to repeat the process several times to completely remove the stain.
- Avoid using hot water to rinse the stain, as it can set the paint. Stick to cold water.
- Check the care label on your clothing for specific washing instructions, and follow them when laundering your garment.
- The sooner you address a paint stain, the easier it is to remove. Try to treat the stain as soon as it occurs or as soon as you notice it.
- Commercial paint removers designed for fabrics can be effective for stubborn paint stains. Follow the product’s instructions carefully, and test it on an inconspicuous area of the fabric first to ensure it doesn’t cause damage or discoloration.
Any Stain on Any Fabric
The method detailed below can be used on any type of stain, and on any type of fabric. You may not be able to remove permanent inks and paints if they’re allowed to cure, but when attempted right away, it can be quite easy to make up for your accident, and cause your clothing look like new again.
More simple stains can be cleaned no matter how long they have been there, or what you have used on them in the past, but for a nasty one like this, attacking it quickly can save your garment, but also save you time and effort in the process. Once dried in place, you’ll probably still get the stain out with enough work, but if you do it right away, the results are pretty much guaranteed, and fool-proof to achieve.
An Easy Way To Clean A Paint Stain On Clothing
It could be a blue paint stain on a white shirt like in the pictures here, or it could be on any other color of paint , and any other similar piece of clothing or fabric. You could remove a paint stain like we have in this case, or you could remove pen, grease, dirt, food, blood, grass, or just about anything else with the same simple process.
The only thing required that you may not already have is some Quick N Brite Paste. This means that you might have to spend some money, but if you save one shirt, it will pay for itself, and once you discover the hundreds of other jobs it works on, you will quickly realize the incredible value offered by this amazing cleaner.
It’s completely safe for any material, and it’ll remove just about any stain you may encounter. It’s probably the best stain remover available for clothing [5], but it also works incredibly well as a degreaser, tub and tile cleaner, window cleaner, carpet shampoo and much more. Get some to fix your ruined shirt, but then keep it around to remove soap scum or clean your kitchen cabinets with a safe and effective product.
Step-By-Step Cleaning Instructions
The process is pretty simple, but follow the steps and directions below to ensure you get the paint stain out of your clothing on the first try.
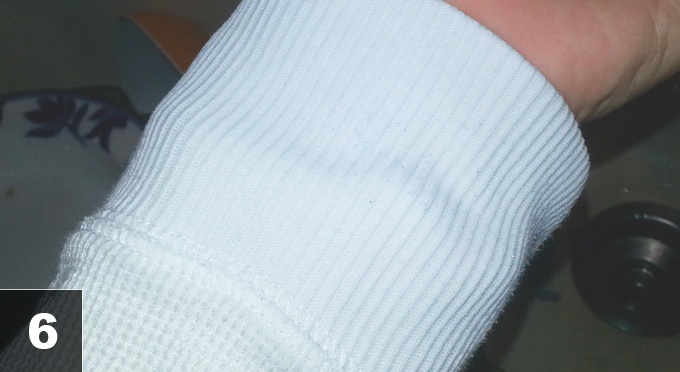
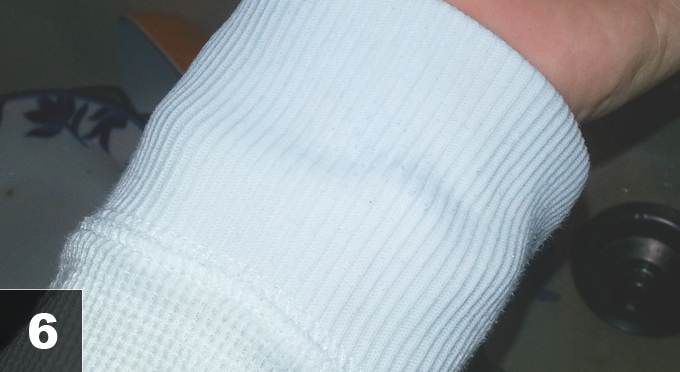
 [6]Step 1: Blot The Area.

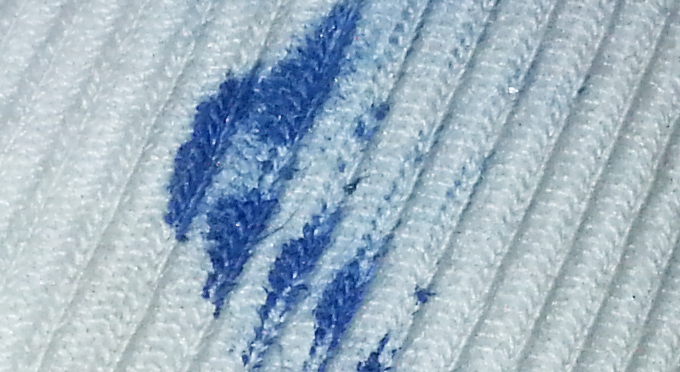
When the paint spot was discovered, it was a thick blob. Still wet at the top, but starting to dry at the bottom. In order to minimize the mess, and remove as much loose pigment as possible, we first took a paper towel to quickly lift away anything we were able to.
A blotting technique is best. As you can see, we did a slight wiping technique that did cause the color to spread a little bit. Once all of the wet and gooey stuff is removed with a paper towel, cotton ball or something similar, you can concentrate on the actual stain left over. The picture above shows what the shirt looked like after wiping and blotting.
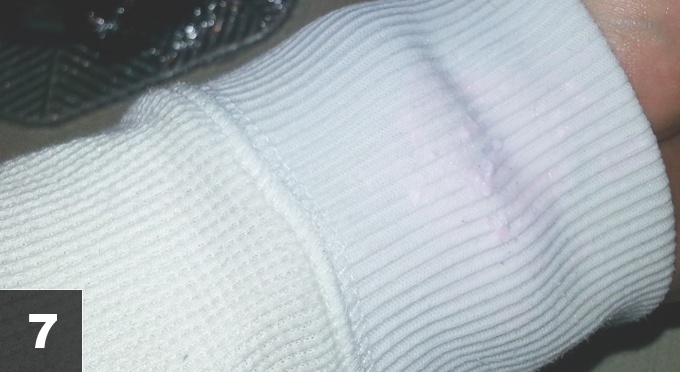
 [7]Step 2: Dampen and Apply Cleaner.
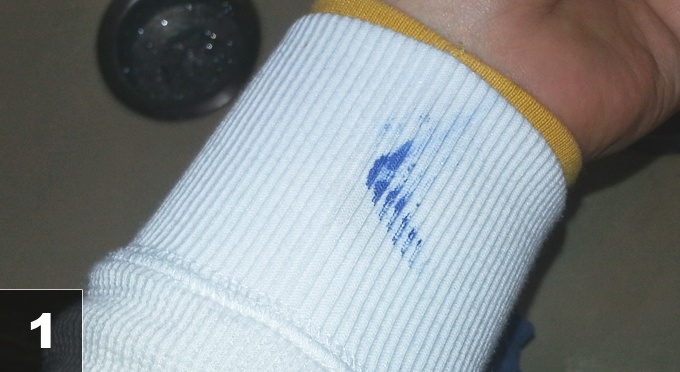
After wiping, we added a little bit of water in order to dampen the sleeve in the area where the paint was. Once damp, an initial application of the cleaner was smeared in place. As you can see, we used a liberal amount in order to cover the entire paint stain, and get down into the little gaps in the shirt material.
The cleaner was gathered with bare fingers, and then worked into the fabric using a scratching motion. The completely non-toxic cleaning solution is totally safe for skin, so you don’t need gloves or anything else. As an option, you can apply it with a sponge, a rag, or a small brush if you prefer.
 [8]Step 3: Buff To Remove The Stain.

Once the cleaner was in place, we let it sit for a couple minutes. After sitting, we took a clean, terry cloth towel, and buffed the area to lift up the cleaner and most of the blue paint. As you buff, you’ll notice that the color from the stain will transfer from the shirt you want to save, and onto the towel you are holding.
In our case, after the first application, the stain was reduced significantly, but still very much there. The blue pigment that soaked down deep is all that remains, but it was always going to be the toughest to remove. The texture of this particular fabric didn’t help matters either. If cleaning a smoother piece of clothing, you may be able to get away with a single attempt, but with dark blue paint ground down into this white thermal shirt, a second application was pretty much guaranteed.
 [9]Step 4: Re-Apply The Cleaner.
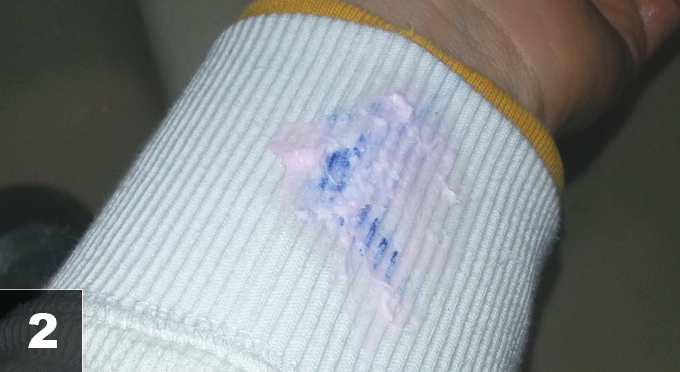
The next step is to reapply the cleaner the same way you did the first time. Make sure to get it wet it again first in order to apply heat, and flush out any loose material. Once the cleaner is on there you will, once again, let it sit for a few minutes. When you let the cleaner sit without touching, it will break down the stain, and float it off the surface.
For tougher stains you will want to let it sit longer, but for any type of cleaning, at least 30 seconds will make all the difference. Because this was a second application to a very tough stain, we increased the wait time to more like five minute instead of just a couple.
If we would have let the cleaner sit for a longer period the first time around, the results may have improved, but this cleaner will only ever remove one layer at a time, so for wicked stains like this one, it will usually take a couple of attempts to make everything disappear.
Once the second application sits, grab your towel like the first time, and buff the stain away.
 [10]Step 5: Lift Remaining Stain Deep In Fabric.

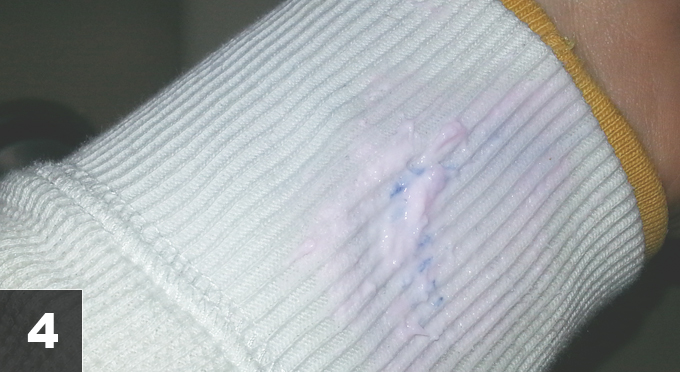
The second application almost did the trick, but a faint bit of blue was still left over after finishing. This little bit probably would have just washed of in the laundry if we had applied a pre-treating layer and then washed as normal, but we wanted to ensure that it was totally clean, and show everyone that perfect results can be achieved by hand, with very little time and effort.
Once again, the stuff left over is the deepest down in the material, and it is more location than anything that is causing the multiple applications in this case. Any material that is smoother will certainly come clean easier, and with less steps.
When compared to multiple steps with another cleaner though, this stuff is like magic. Another spray cleaner, used two times in the same area is more likely to create a bleach spot, ruined fabric, or a larger blue smudge instead of the pretty amazing results you see in the picture above.
 [11]Step 6: One Last Light Cleaning.
Third time was a charm! As you can see above, after applying it a third time, the stain is basically gone. Most people won’t be able to see in the photo, but there was a faint discoloration that could still be detected if you tried hard enough. Most of you would not even notice it, and to the naked eye, the stain was pretty much removed. The third application went the same as the second one. We let the cleaner sit on the stain for about five minutes before rubbing it off, and after this last attempt, no blue paint remained on the white fabric.
 [12]Step 7: Launder For Maximum Clean.

Because we are clean freaks and perfectionists around here, we took this one step further to ensure no signs of the paint remained, no matter how close you inspect. This last step involved us adding one last application of the cleaner. This time though, we didn’t rub it off, we just let it sit on there.
Once in place, the shirt was tossed into the laundry basket for washing later. Although it was essentially clean after the third application of the cleaner, adding this last layer prior to washing it was in an effort to eliminate anything else left over, when it goes through the wash.
For basic dirt and staining, this last step alone will work to remove many things that other products don’t work on. Just rub some Quick N Brite on the stain, and then let it sit for hours or days before washing. Use your regular detergent, and wash like normal, but then notice how much cleaner your garments get.
In this case, after washing, the favorite shirt was able to go back into rotation as not one spec of blue paint was left on it. Success!
Don’t toss out clothes just because they have a stain, and don’t avoid painting projects just because you’re accident prone. You could use the useless product you have in your laundry room the next time you run into some wet paint, but you could also use this instead, and actually get the fabric clean. Other products are loaded with harsh chemicals and bleaching agents because they try to burn through, or dissolve stains instead of removing them.
This product is different. It’s totally biodegradable and environmentally friendly. You can safely use it around children, pets and food, and you never need ventilation or rubber gloves when you clean with it. Despite how gentle the formula is, it is incredibly powerful when cleaning any type of stain. Instead of trying to pulverize whats there, it will naturally break it down, and float it above the surface so that you can remove it without effort.
Guaranteed To Be Clean
Complete with a money back guarantee, Quick N Brite comes with proven performance. Why guess with other products when you could get this one and guarantee the outcome? Use it with confidence to remove paint and other tough stains from shirts and other clothing, and never worry that it won’t work, or what possible damage may occur. The technique above is fool-proof, and when cleaning with Quick N Brite, your results are guaranteed.
Tips For Success
- Use the paste version. Liquid Quick N Brite is great for other jobs, and extremely convenient, but for tough stains like this, you really need the paste.
- Wet with HOT water only for set in stains. Heat helps the cleaner work, but it can also set in a fresh stain to make it more difficult to remove.
- A damp surface will allow the stain to lift easier. Prior to each application of cleaner, make sure to wet the area with water.
- Patience is a virtue. Letting the cleaner sit is key to removing stubborn grime like we did here. Make sure you let each application sit for a period of time, and don’t be surprised if the stain takes more than one application to clean.
Products Mentioned:
- Quick N Brite Cleaner – Buy Some [13]