 You know how it’ll go…Your otherwise brilliant child decides, for one reason or another, to sit on, or snuggle with their clump of Silly Putty, and the next thing you know, they are whining about a sticky stain on their favorite piece of clothing, or the carpet in their room, and you’re searching the net for an appropriate course of action.
The internet is pretty useful for some stuff, but when searching for the best way to remove this stain, you’ll probably find some terrible advice, or the same advice in multiple locations.
Even the manufacturer recommends creating a new stain to remove the old stain, followed by advice on how to remove the new stain created by removing the old stain. What?! Has the world gone bonkers?
The world may indeed be crazy, but you don’t have to drive yourself insane trying to pick, freeze, scrape, or lubricate silly putty off of clothing, fabrics and carpeting when the inevitable disaster takes place.
What Is Silly Putty
Silly Putty is a popular toy and modeling compound that has been enjoyed by children and adults for many decades. It was first introduced in the late 1940s by Peter Hodgson and quickly gained popularity due to its unique properties.
It’s made from a silicone polymer compound called polydimethylsiloxane. It has a distinctive texture that is soft, pliable, and stretchy. Silly Putty behaves like a solid and a liquid simultaneously, which allows it to exhibit some fascinating properties.
When you let it rest, it behaves like a solid and can be shaped, molded, or rolled into various forms. It can be used to pick up impressions of newspaper print, comic strips, or other textured surfaces, and it’s also known for its ability to bounce, albeit not as high as a rubber ball.
When Silly Putty is stretched or pulled quickly, it behaves more like a liquid and elongates. It can be stretched into thin strands or formed into long ribbons. Once the stretching the force is released, the liquid-y goo will return to its original shape.
The unique physical properties of Silly Putty are what make it such a disaster when it gets stuck to carpets, blankets or clothes. Almost like a liquid, it’ll penetrate the material to get down deep. Once stuck in place it will solidify and become more like a solid. When this stuff gets on your clothes, it’s not like any regular stain. It is a thick gooey material that has bonded with the fabric, and that’s why it seems so difficult to get it out.
How To Get Silly Putty Out Of Fabric
Although the glorious world wide web is full of useful information, it is equally stuffed with bad advice that has been copied and pasted over and over again. Just because several websites offer the same directions to clean something, it does not make it any more effective. In fact, it may be evidence of just how useless it is, and how nobody really knows what they’re talking about.
Do any of these sites actually test this stuff? Probably not, right?
So as not to be left out, but also to give you exact examples of the cleaning techniques we’re talking about, we’ll list some of the commonly offered directions for removing silly putty. After that, we’ll show you an easy way to eliminate the mess without trying too hard, or wasting too much time.
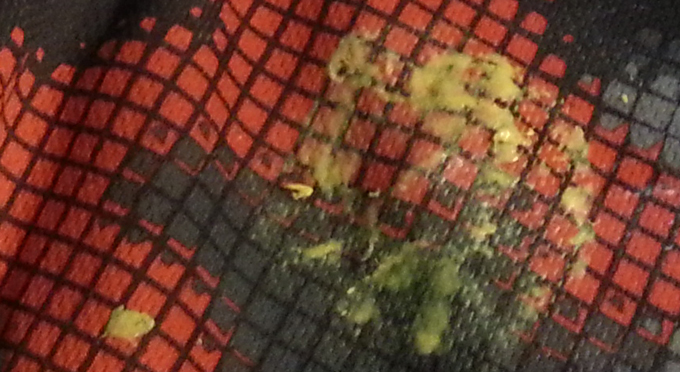
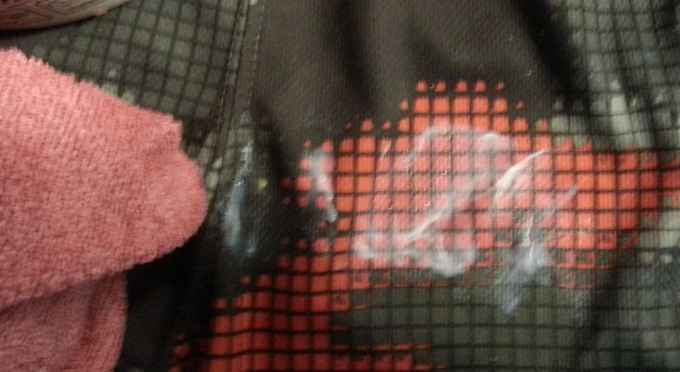
In the example below, the gooey putty is mashed into a pair of mesh shorts, but the same technique would work on any other clothing, carpeting, fabric, upholstery, couch, chair, blanket, comforter and more.
You could certainly give some of the popular home remedies a try, but you could also snap back to your senses, and realize that WD-40 is best kept in the garage, and is most useful for lubricating things, not cleaning.
Top 4 Ways To Clean Silly Putty
The techniques below are what everyone else will tell you to do. If you work hard enough, one of them will probably produce good results. The main problem is that removing silly putty does not have to be that hard. It should not require multiple steps, long procedures, careful picking and scratching, or using one substance to clean up the mess made by another.
You will all have the ingredients necessary to give these methods a shot, but if you’d prefer to avoid torturing yourself, you can skip down to the simply good method to eliminate all of the gooey stuff, and every drop of color, with a quick and simple technique.
1. Use WD-40
This is the most commonly offered solution by far, and it’s one that even the manufacturer features on their website. The idea behind it is that the OIL will lubricate the putty to the point of it releasing it’s bond with the fabric.
Once loose, the Silly Putty will be removable, but you will also have the WD-40 soaked clothing to deal with afterward.
Ever search for how to remove oil stains? Yeah. It’s pretty tough stuff. Once you scrape and pick all the putty off, they then go on to recommend using rubbing alcohol to get the oil stain out. Although the oil may be tough to get out, you should have a clean piece of clothing once that step is complete.
- Use a butter knife or similar tool to gently scrape and remove any excess putty.
- Spray with WD-40 or similar product and let it sit for about ten minutes.
- Scrape again to remove lubricated putty.
- Repeat steps one and two as necessary until putty is eliminated.
- Attempt to blot up remaining oil with cotton balls.
- When that doesn’t work, add rubbing alcohol to the cotton balls and blot again.
2. Use Rubbing Alcohol
As a close second, rubbing alcohol is also widely recommended for getting Silly Putty out of fabrics and clothing. People who don’t know any better say that it will effectively dissolve the mess in order to make it easy to remove. Although it will work with trace amounts, when you have a larger mess, rubbing alcohol may not be the best choice. It will only loosen one layer, or a small amount at a time, so you’ll have to reapply multiple times to finish the job.
There are a variety of techniques that are used when attempting this method, and they range from soaking the back side to repeatedly applying it directly to the stain, and just based on that, you can be pretty sure that it may not work that well.
If you do try hard enough, and put in enough work, you should be able to remove the putty, but it will definitely take a while, and with all of the scraping required, you’ll might just end up damaging the fabric in the process.
If you do actually manage to remove all of the gooey stuff, you are almost guaranteed to have some color that will remain as a stain afterward, and no amount of extra alcohol will make that go away. To finish the job, you may have to address the stain leftover with a something other than rubbing alcohol.
- To try this technique, place the stained clothing on a flat surface, and stretch it out so that it is totally flat.
- Apply rubbing alcohol directly to the putty by blotting it on with a cotton ball. Make sure to fully saturate and repeat if necessary.
- Once the alcohol has been applied, and had some time to work, use a butter knife or spoon to gently scrape to remove as much putty as you can.
- Some will remain so repeat steps 2 and 3 as needed until all putty is gone.
- Once gone, treat the remaining stain as needed, and then launder to finish the job.
3. Freeze It
Because it looks like gum maybe? Not sure why anyone would waste time trying this, but plenty of people have, and many recommend it to others. It will sort of work because Silly Putty does act differently when cold, but it’ll take a lot of work to get all of it out with this technique.
Using an ice cube, or by placing the whole piece of clothing right in the freezer, this technique is supposed to harden the putty to the point of making it easy to pick off.
Forget about the fact that you have to wait forever for the Silly Putty to freeze, and just concentrate on the idea of you picking and picking for an hour or more only to realize that you are probably not going to get every last spec out of the fabric with this technique.
If you have no other options available, or if you want to try the method that is least likely to damage the fabric or clothing that is stained, then freezing may be a good technique to try. It will never be the fastest way to go, but with careful effort, you can have good results.
- Remove any excess putty with a butter knife or spoon.
- Use an ice cube in direct contact, or place the garment into your freezer.
- Once the putty hardens, use the knife to gently scrape and pick.
- Repeat by re-freezing and picking again.
- Repeat by re-freezing and picking again.
- Repeat by re-freezing and picking again.
- Continue the technique until you get it all out, and the area looks clean.
4. Use More Putty
Yep. People actually do this. It kinda makes sense, and it will work to get some putty off, but you can never clean a tough stain, or do a thorough job when using this technique. Silly Putty does stick to itself, so many people will try to dab the mess on the clothing with another chunk in order to pick it up.
This technique can work for a small stain, but you will never get the area completely clean. You may want to try this as a way to get off excess putty safely, but as an all-in-one solution, it is pretty weak and ineffective.
- To try this method, remove as much Silly Putty as possible by picking with your fingers or a knife.
- This technique is best for excess putty, or putty that is only loosely in place.
- To lift up loose putty, take a separate chunk, and then press it into the blob that is stuck to your clothing.
- Use a careful technique, and repeat as necessary.
An Easy Way To Get Silly Putty Out Of Clothing
Follow the simple steps below to discover one of the easiest and most effective ways to remove silly putty from clothing. It will not require intense scraping or careful picking, and you won’t have to run out to your garage or basement to get the supplies necessary.
Once you finish, there will be no signs of any color or goo left on the clothing, and it will be ready to wear again. The technique itself only takes a few seconds of your time, but you do have to spend about five minutes doing nothing, so the overall job may take almost ten minutes to finish.
You won’t run any risk to the clothing, and you won’t have to guess whether or not it will work. When using the method below, YOUR RESULTS ARE GUARANTEED.
What Fabric Is It Safe For?
You can literally use this method on any type and color of material. It does not matter if is mesh shorts like in the picture, blue jeans, a cotton shirt, or even silk. It’ll work on them all, and it will not ruin the material, or remove any color from the fabric. Beyond just clothing, it will also be safe and effective for any other surface or material that silly putty gets stuck to. A slight modification may be necessary in some circumstances, but in general, you can do the same thing to get it off of any couch, blanket, chair, rug or curtain as well.
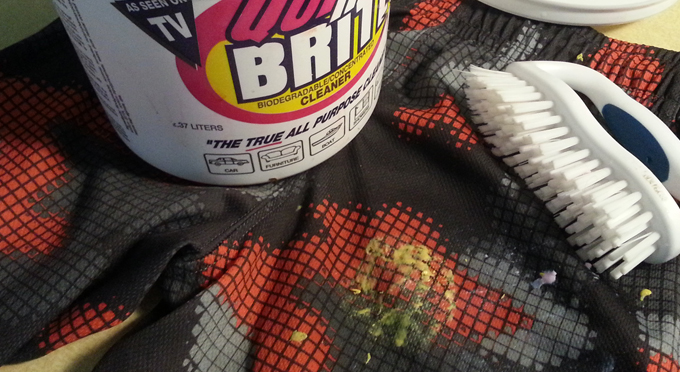
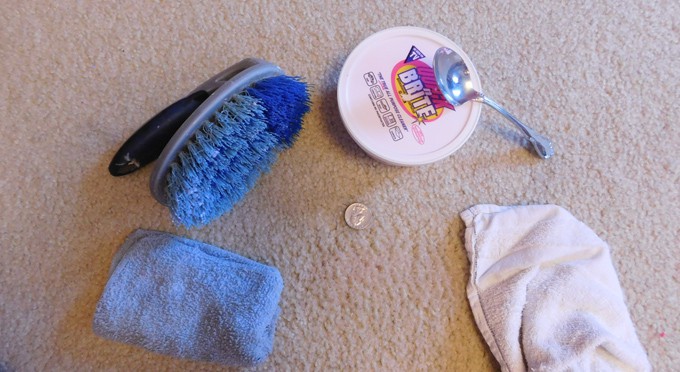
Stuff You Will Need
- Quick N Brite – Yes, you will need to buy some if you don’t have it yet, but if you don’t have any, you should be asking yourself why, not complaining about the cost. It dominates on this job, but you can also use it for hundreds of other cleaning tasks where it will outperform the stuff you’re using now. As an added benefit, it is totally non-toxic and biodegradable, and completely safe for use around children and pets.
- Cleaning cloth or towel.
- Scrub brush, toothbrush or something similar (optional).
- Fingers with nails.
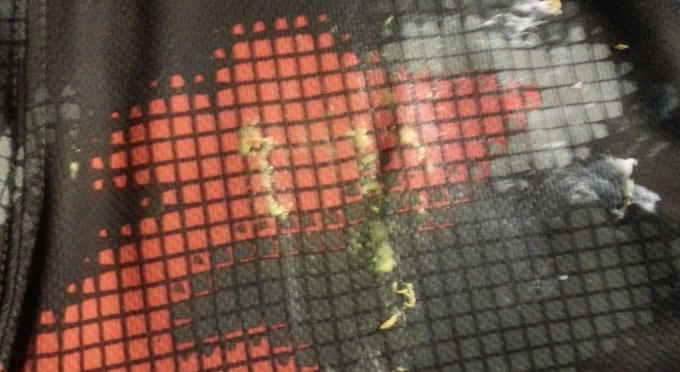
 Step 1
As with any of the other methods for getting silly putty out of clothing and fabrics, you will want to get rid of anything you can by quickly pulling off the large chunks with your hand. Don’t work too hard. Just take off the putty that’s easy to remove, then move on to the next step. When you finish, you will still have quite a bit of putty left stuck in place, and it should look similar to the picture above.
 Step 2
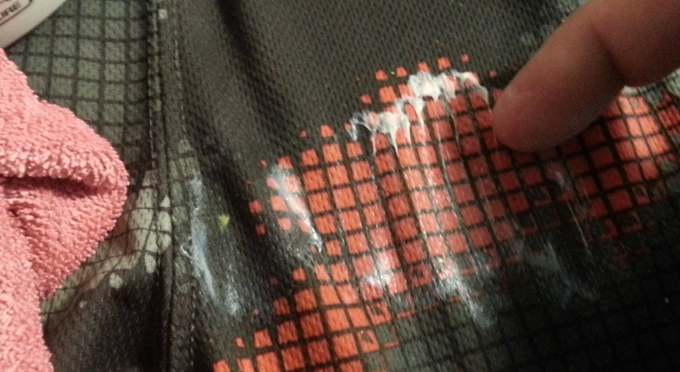
Once you get the bulk of the putty off, it’s time to apply the cleaner. You will need the paste version for good results, and you should use a liberal amount to ensure that the job is easy.
Just scoop some out with your hand, and then rub it over the putty. Once the stain is covered completely, JUST LET IT SIT. Wait for about five minutes to give the cleaner time to work. If the material or stain seems particularly stubborn, let it sit for ten minutes.
While it sits, the cleaner will break down the material and also make it slippery. After it has time to work, the putty will literally slide right off the surface with no picking or scraping necessary.
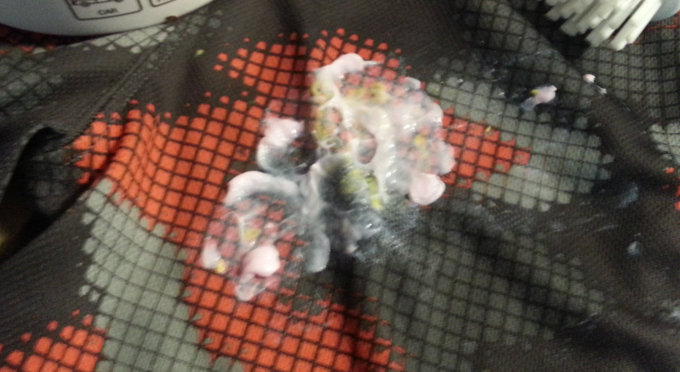
 Step 3
To speed things along, and to loosen more squished in stains, you can use a brush to work the cleaner after it sits. You don’t need to scrub, and in most cases, this step is not even required. For more set in stains, or for those that a child has sat on, or slept on, it may be necessary to work the cleaner down as far as the the putty because it can get pretty well fused with the material. Skip this step for small stains or delicate fabrics.
 Step 4
After sitting for several minutes, and after you lightly scrub if desired, the putty will be loose enough that you can slide it right off with your finger.
Notice the clean area at the center of the stain above. This area was created by one or two downward passes with a fingernail. Once the putty is sliding this easily, you can quickly remove most of it with a quick scratching motion. You won’t need to press down or work too hard. With just light pressure, the Silly Putty will glide right off the surface.
 Step 5
Use your fingernail to swipe away all of the large chunks, but again, don’t work too hard, and don’t obsess over getting every spec off. We’ll take care of that in the next step.
Once the surface looks like the picture above, with some visible putty and plenty of color left over, but no large chunks, it’s time to break out your cleaning cloth or terry cloth towel.
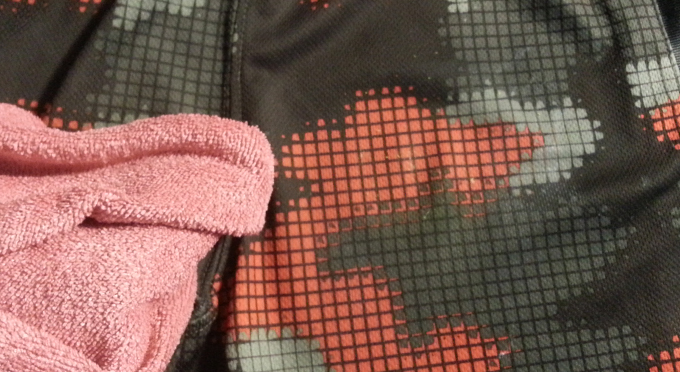 Step 6
A good microfiber cloth works really well, but any old rag will do as long as it has a little bit of texture to it. Use the cloth dry, and then gently rub the area to remove excess cleaner, and 99% of the silly putty that remains. You won’t need to rub hard, or scrub at all. The remaining putty will still be slippery, and it will have no real bond with the material, so it will come right off.
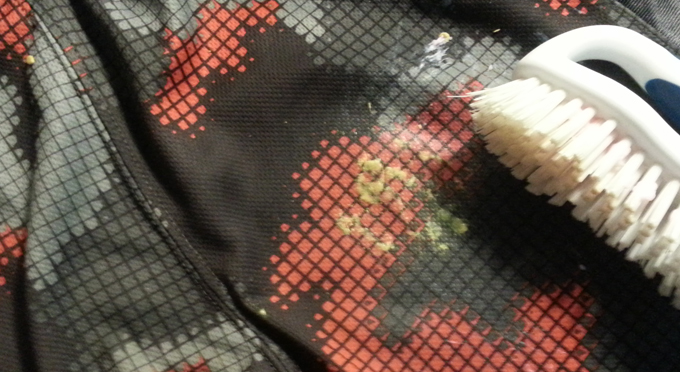
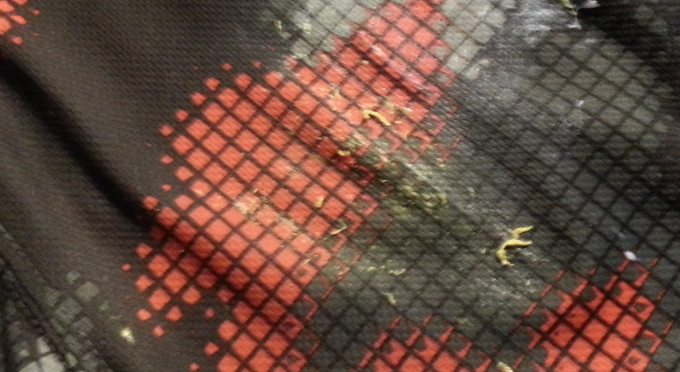
 Step 7
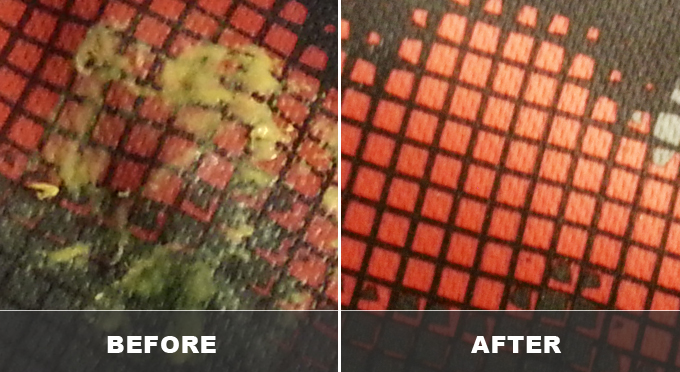
For some people, the results thus far might be good enough, but if you take a look at the picture above, you’ll notice that there is a teeny tiny bit of putty left over. When zoomed in, you will see that some yellow coloring remains, and there are a few bits still stuck in the mesh material.
For us, this is not OK, so we continued in order to eliminate every last spec. Sending the shorts through the wash at this stage would probably take care of the small stain that was left, but you can also quickly do it without washing, so the shorts can be warn right away.
 Step 8
Just take a small amount of cleaner and apply it to the surface to cover the remaining stain.
 Step 9
Use your fingernail to work the cleaner into the silly putty, and then let it sit for a couple minutes.
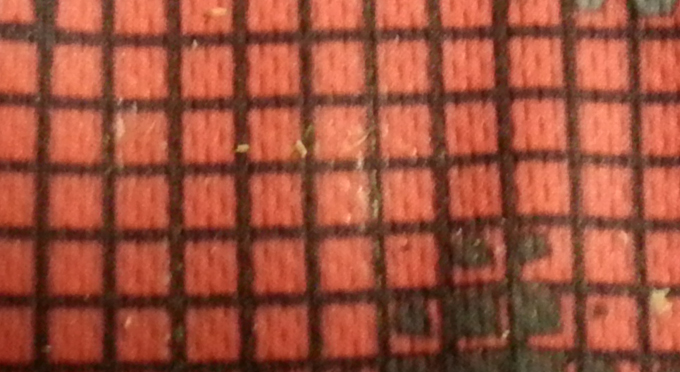
 Step 10
After it sits, take your cloth again, and quickly wipe to reveal a surface that is totally clean. Take a look at the zoomed in version below to see a side by side comparison. Even when looking very close, you will not see any yellow stuck in the material, and you will not see any yellow staining on top. You will be left with a completely clean piece of clothing, and after drying for a few minutes, it will be ready for your brilliant child to wear again.
Getting Silly Putty out of clothes is one of those jobs that has most of us running to the computer, or picking up our phones to find out what other people are saying. Unfortunately, it’s also one of those jobs that everyone is doing wrong, and misery loves company.
Don’t get duped into trying methods that are destined to fail, or soaking your child’s clothing in oil just to remove this fun material. Our simple method is guaranteed to work, and you will never create a new mess to be cleaned, or ruin the piece of clothing you’re trying to save. Sure, you have to buy some special cleaner, but it’s not a specialized cleaner that only works for this single job. It will produce amazing results to thwart disaster in this case, but you can also use it to clean your tub, de-grease your cabinets, clean vinyl siding, pre-treat laundry and so much more.
Get it to avoid catastrophe the next time Billy is trying to copy the comics section with his fresh batch of putty, but keep it around to save even more money when you remove grass and blood stains from his jeans, or hard water stains from your shower door.
Tip Contents
- What is Silly Putty
- How To Clean It
- Using WD-40
- Using Rubbing Alcohol
- Freeze It
- Use More Putty
- An Easy Way To Get Silly Putty Out
- Step-by-Step Instructions
- Update
Products Mentioned
- Quick N Brite – Buy some or find out more.
- Microfiber Cloths – Buy some, or find out more.
- Scrub Brushes – Buy some or find out more.
Update: Customer Feedback
The description and photos above can only go so far to prove how well this method works to get any type of play putty out of clothing and fabrics. That’s why we love customer feedback via the comments below, emails, or reviews. When a customer takes the time to share their experience with us, we are truly grateful, and in an effort to help even more people, we like to share whenever possible.
The internet is so full of fake news and doctored photos, it’s tough to know what to believe, or if some product will work as well as someone says it will. That’s why real pictures form real users are the best.
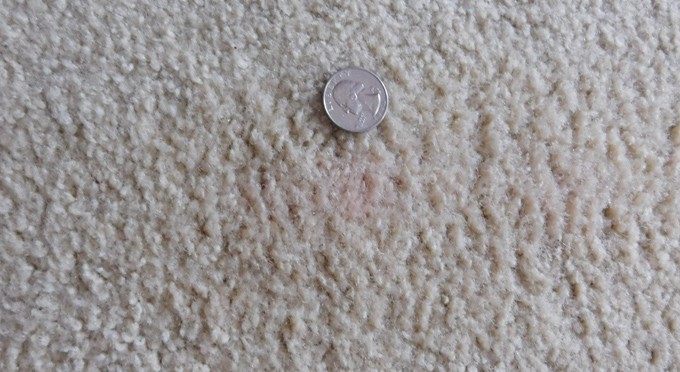
Check out the following feedback from a real customer, and notice the amazing results she got with set in putty on some carpet that was bright pink in color.
I wanted to share these pictures. I bought Quick n’ Brite to try to remove Aaron’s Thinking Putty from my son’s pajamas and quilt. (He fell asleep in bed holding it.) I didn’t know what to think before I started, so I didn’t take pictures. Once I saw how well it worked, I decided to try the year old silly putty on my daughter’s rug.
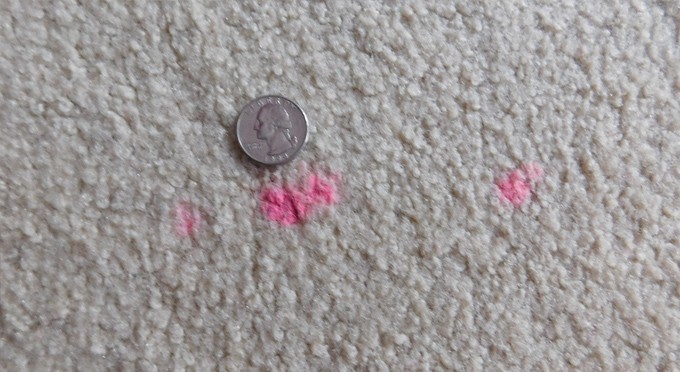
I have spent a great deal of time picking at the putty trying to get it out, and trying to get any debris our out of it. I did not try WD40 or anything like that, as I did not want to saturate. The proof is in the pictures. I left the cleaner on the putty for about 15 minutes, since it was so old. I used the spoon to put it on, my fingers to rub it in, a bristle brush to get it up, a damp washcloth to clean it, and a dry towel to take the dampness out of the carpet.
At the base of the pile, there is still a little pink, but I am okay with that.
It looks great. Thank you.


 Ordering Info
 Customer Service
 Follow Us
 Search For Stuff
 Find Us
 Call Us
 Pay Us
This is silly – rubbing alcohol works fine! No scrubbing or scraping, just let it sit and the silly putty melts away.
Correct. As we mentioned above, rubbing alcohol can be effective in some situations to dissolve and eliminate the putty. In comparison to our preferred method, it will always take longer, smell worse, involve more risk, and cause more unintended harm to surfaces being cleaned, and it will be less effective in general. The nice thing about it though, is that most people have some on hand. Although it is probably the best common alternative to what we recommend, it is not going to work in every situation, or on every surface. Beyond that, the longer the silly putty is in place, the less effective the rubbing alcohol will be.
It works! My son fell asleep with Aaron’s Thinking Putty in his hands. He woke up with putty all over his pajamas and comforter. I was skeptical as to whether this would work, but I thought it was worth a try. It worked, as reported. It was quick, easy, and you would never know it was there. Thank you, that saved me a great deal of headache.
So glad to hear that it worked for you! Thanks for the feedback.
Or you couldve done like me and just scrolled down until you see “The simply good way” in nice bold print. wasn’t that hard to find.
Is it possible to just tell me how to get it off without being such a jerk about the “bad methods”? I appreciate humor but it was nonexistent in this article. Seriously, it took me forever to get your suggestion. By then I was so annoyed that I gave up.
You know what IS funny. People who go out of their way to be even more useless than the advice they are complaining about. That’s hilarious.
Next time we’ll try to keep it monosyllabic and concise for you, and avoid any big words and grammar usage that might be confusing or annoying.
Nice article, thanks…. what about when that silly putty gets on your new leather upholstery?