 You know how it happens…Your two-year-old is coloring quietly and you are thinking to yourself what a great job he is doing. You look away for a second or three to do something else only to turn your attention back and find that he has switched from drawing on the large white board he is allowed to use, to destroying the nice wood chair sitting next to it. Dry erase marker wipes nicely from those slick white surfaces, but if it gets anywhere else, it can be a real pain to remove. It becomes even more difficult when it is on a surface like wood because you are left questioning the correct method and cleaner to use. Do you use the cleaner that you know will work on the marker only to damage the finish? Or do you use something safe for the chair only to have the stain sit there and laugh at you? This can be a tough decision to make, and most people will choose the wrong thing or go through extensive effort, only to have the colorful mark remain, or only fade slightly.
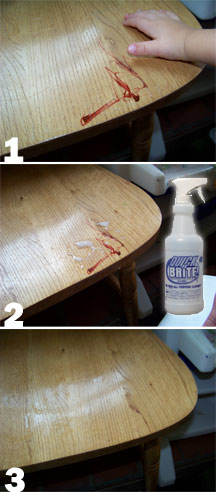
Because this was a real life situation, and because the wood looked considerably better without the drawing, a quick cleaning was in order, and the following will document the process in order to help you if you are facing a similar situation. The picture to the left shows the three step process that was used to completely remove the dark color, and the fast and safe method that was used, did not pose any risk to the material. This was a natural wood chair with a standard glossy finishing coat, but a similar technique would work just as well for shelving, tables, flooring, a door, wood paneling on the wall, a dresser and more. It is even safe enough to use directly on children’s skin, and it works really well to pull tough stains like this out of clothing too. Sure it would be easier to just let them color with crayons, but what fun is that. Kids love to draw with markers, and when you no longer have to worry about cleaning it off of unauthorized surfaces it is not such a big deal anymore.
What To Use & How Much
The cleaner that was used to eliminate this mess was Quick’n Brite. It is a naturally formulated substance that is extremely effective, yet totally safe at the same time. We had a quart spray bottle with just 3 tablespoons of the cleaner and the rest water. This is just pennies worth of the cleaner, so it is also a very economical solution too. This particular job was pretty light weight, so we only needed a diluted mixture, but if your kid was a little more enthusiastic, you may have to use a second application at the same strength, or work with a bit more cleaner-heavy solution. For any really tough job, or for marks that just won’t go away, use the paste version full strength to get rid of it easily. You don’t run any higher risk when you use a more concentrated blend, but it does end up costing more due to the higher consumption. A little bit will still go a long way, so even when use at maximum strength, you are looking at maybe a nickel instead of a few cents.
How To Use It:
Working with Quick n Brite is nice because you are basically guaranteed results, and you never really have to worry about making a bigger mess, or ruining the object you are trying to improve. You can’t really help doing a good job as long as you are using the right technique, but you do use it a bit differently than traditional options, so follow the steps below for quick and easy success.
- To get started, you will want to determine the strength necessary for the job. Anything that looks similar to the picture, go for a heavy solution, but if it looks a lot worse, just use the liquid or paste in full strength formulation.
- To apply the cleaner, simply spray your heavy, all purpose spray onto the chair, or if you are using full strength, get a damp towel, add some to it, and then apply to the stain using your towel.
- Make sure to cover the whole area, and once you do, sort of work it in a little. You don’t really need to scrub, but you do want the cleaner to penetrate a bit, and cover completely.
- Once application is complete, let it sit for a few minutes. For light marks, as little as 30 seconds would work, and for heavy ones, you may want to let it sit for 10 or 15 minutes. When in is allowed to sit, it will break apart the marker stain and lift it up, so that you can easily remove it without scrubbing.
- After it sits, take a clean paper towel or terry cloth towel and wipe the area clean. If it is a darker color, or slightly more force was used to put it there, you may need a second application to completely remove it.
Quick’n Brite is an enzyme cleaner, so once you spray it on, it begins to break apart the marker and lift it off the surface. This makes scrubbing unnecessary, and allows you to easily remove the stain. It would work the same on any other hard surfaces like doors, walls, dressers, tables and more. If the dry erase marker was on carpet, it will take slightly more effort, but it is still totally doable. You will need more cleaner, and it will need to be worked into the carpet fibers a bit using your hand or a brush or something, but with slightly increased effort, you can certainly get the job done. Let it sit there slightly longer for a more simple elimination process. When working to remove a marker spot from fibrous material instead of a hard stuff, the paste version, full strength, may give better results if the all purpose spray is not achieving desired outcome. The paste can be used on any surface where the staining is more severe or being stubborn.
PLEASE NOTE: This MAY NOT work for permanent inks or dyes like those found in thick black magic markers. It WILL FOR SURE work on dry erase marker, ball point pen ink, finger paints, colored pencil, crayons, water colors, acrylics, pastels and more though.


 Ordering Info
 Customer Service
 Follow Us
 Search For Stuff
 Find Us
 Call Us
 Pay Us

Amazing stain remover. Great wood cleaner
Thanks for the information. I’ve been trying to google it for a while.
Thanks dude, I never knew that, thankyou.
It sounds like you’re creating problems yourself by trying to solve this issue instead of looking at why their is a problem in the first place