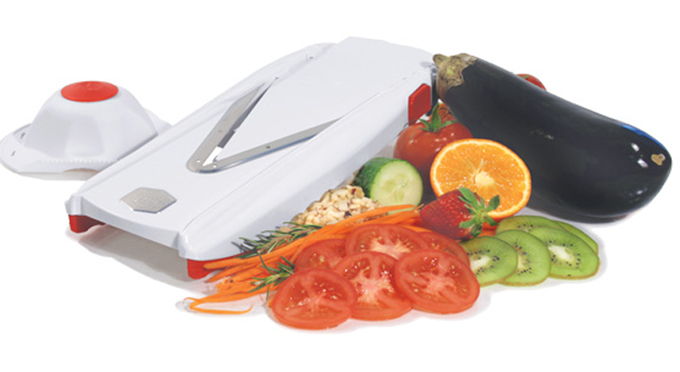
 The V-Power Mandoline slicer from Borner is a high quality tool manufactured in Germany, and it allows you to slice, dice, chop, and shred with incredible accuracy, and amazing speed. It’s the newest version from the makers of the original V-Slicer, and it has the same razor sharp, v-shaped blade, but it also has a number of upgrades and changes that set it apart from the classic model. The complete set comes with everything you need, and together it will allow you to perform 10 different types of cuts.
Borner V-Power Instructions For Use
Basic slicing is pretty straight forward, but making sticks or cubes from fruits and vegetables can be a little more difficult. With proper technique and a little bit of practice, anyone can use this slicer to prepare food with professional looking results. Continue reading to learn about every part included in the set, and also to discover the correct way to use this tool. Once you get to the bottom, you’ll be an expert on it’s function, and you’ll be fully prepared to slice tomatoes, dice onions, or julienne zucchini.
What’s Included
- (1) Mandoline V-Slicer
- (2) Blade Inserts (3.5mm & 7mm)
- (1) Thickness Insert
- (1) Safety Food Holder
- (1) Insert Storage Caddy
- (1) Instruction Booklet
Important Safety Information
CAUTION: The metal blades are extremely sharp! Take great care each time you use your V-Power. Prior to your first use, it is essential to read the instructions in full. Never touch the metal blades with your bare hands. Only touch the plastic parts. Use extra caution when children are present, and never allow them to touch or play with the slicer. Whenever possible, store the slicer in a safe place that is out of the reach of children.
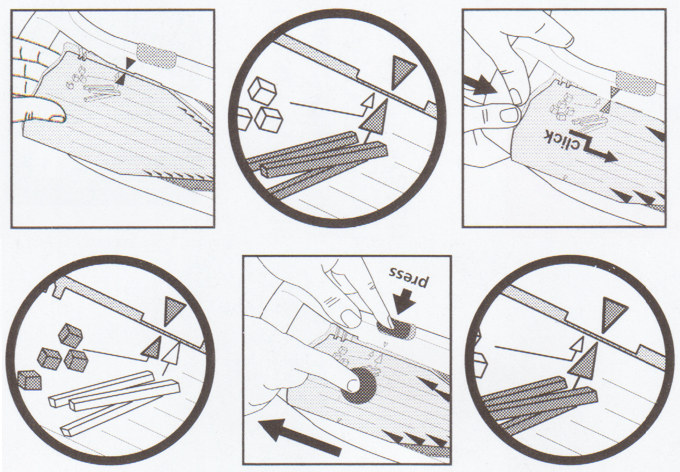
Safety Food Holder
CAUTION: Never hold the food you are cutting with your hands. Always use the safety holder!
The holder that comes with this set is fully compatible with any other Borner slicer, as well as other models by other manufacturers. It’s clever design will allow you to safely process fruits and vegetables with virtually no waste, and no risk of injury. It holds any type of food securely, and allows you to press out more as you slice. The large size keep fingers away from the blade, and easily accommodates anything you are trying to cut.
If necessary, peel fruits prior to slicing. For vegetables like cabbage and onions, put the core or root end into the holder first so that the knob on top is pushed up. For larger fruits and vegetables, just halve or quarter before you add them to the holder. To use it, simply slide the holder continuously with light pressure in a back and forth motion. When working, ensure that the direction you are moving matches the direction of the arrows on either side of the holder.
IMPORTANT: You do not need to press down, or apply pressure. Let the precision German blades do all of the work for you.
When you reach the point when there is nothing more being sliced, gently push down the top knob to cut the remainder of your fruit or vegetable.
CAUTION: Incorrect use of the safety holder may result in injury, and will damage the blades of your V-Power Mandolin Slicer.
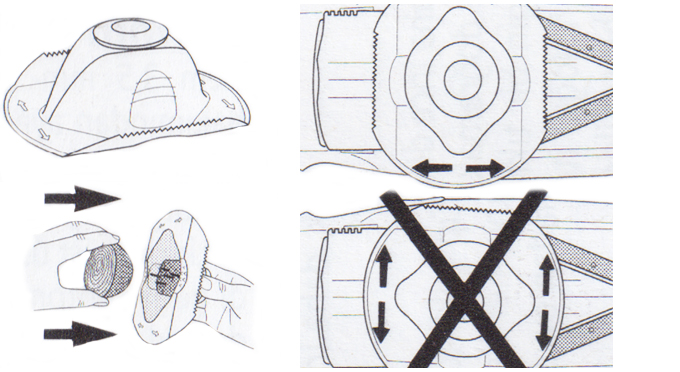
Thickness Insert
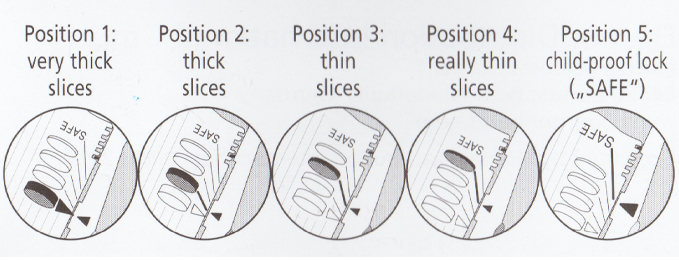
This plastic insert will be the one installed in your slicer when it arrives. It has no additional blades on it like the other two inserts do, and it will allow you to adjust the thickness of your slices. Simply set it to one of five positions to achieve the exact thickness you want.
When brand new, it will be in position 5 or the “safe” setting where the plastic sits flush with the blade to prevent accidents. You should always store your V-Power in “safe” mode as well. This will make it childproof, but also prevent accidental injury of adults that are not paying close enough attention.
To unlock the insert from the childproof lock, just press the colored button on the side of the frame. Use your index finger or thumb on one hand while holding the slicer steady with your other hand. Release the insert using light pressure as in the photo above. Once the arrows on the frame match up with the arrows on the insert, you should be able to lift it out easily. CAUTION: Never touch the insert close to the blades.
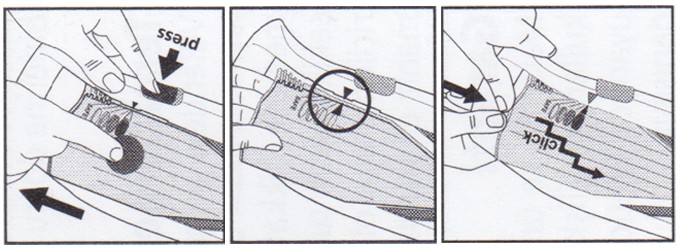
Installing The Thickness Insert:
- Locate the arrows on both sidebars of the frame, and also on top of the insert.
- Slide the insert into the frame when the arrows on both sides match. The insert is now automatically in position 1.
- Your slicer is ready to use, but if you want thinner pieces, simply slide the insert forward, one or more levels. You will hear a click as it locks into place.
- When finished, or to activate the childproof lock, slide the insert all the way forward and into position 5. In this position, the blades are protected, and they will not cut.
3.5mm And 7mm Blade Inserts
Both of the julienne inserts are adjustable in height, and they can be used in one of two positions. One slot is marked with long sticks, and the other with smaller cubes. The stick slot will be the thickest, and the cube slot will be slightly thinner. The width of your cut will be determined by which blade insert you have installed.
Installing The Blade Inserts:
- To install, locate the arrows on the frame, and match up with the arrow on the insert you intend to use.
- Once lined up, lightly press the insert into the frame and it will automatically be installed at position one, the thickest setting. In this position you can cut thick strips.
- If you want to cut thinner strips or cubes, push the insert forward until it clicks into position 2.
- To cut strips, use light pressure and a continuous up and down motion.
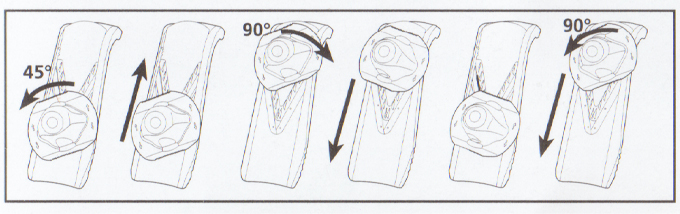
- To dice fruits and vegetables, turn the food holder and position at a 45 degree angle before the first cut. Slide down to cut, then rotate 90 degrees in the opposite direction and slice again. Continue rocking back and forth to chop a pile of cubes. See the picture below.
Cleaning Instructions
- To clean, set the thickness insert to position 5, the safe setting.
- Rinse the V-Power and the inserts under warm or cold running water. Use caution and avoid touching the metal blades.
- Rinse the safety holder as well.
- Place wet blade inserts into the storage box and then attach storage box to the back of the slicer.
- The unit is now free standing and able to dry thoroughly.
- CAUTION: Never leave parts in soapy water to avoid accidental touching.
- CAUTION: Always store out of reach of children.
- Dishwasher not recommended as high temps and strong detergents may damage or reduce effectiveness over time.
2 Year Guarantee
Every V-Power comes with a full 2-year guarantee to protect you against material and production faults. This guarantee does not cover problems that occur due to improper use, but it will cover you against a faulty unit, and ensure that you have a tool that will last for many years of regular use.


 Ordering Info
 Customer Service
 Follow Us
 Search For Stuff
 Find Us
 Call Us
 Pay Us
Where can I find instructions on what blades to use for preparing different fruits and vegetables? For example if I want to julienne carrots.
The booklet that came with my Borner V5 slicer is extremely limited with any information IN ENGLISH on how to use it for different purposes.
If you take another look at the instruction book, and look ALL THE WAY IN THE BACK, you’ll find full instructions in English. Use the key at the right, and look for “UK”. To julienne any vegetable, you will be using one of the inserts with the blades sticking up. Use the 7mm one for fatter pieces, and the 3.5mm one for skinnier shreds. When installing the inserts, you will have two positions to choose from, and thickness will adjust depending on which one you choose. To do the actual slicing, use the food holder to secure your carrot, and then slide it up and down while applying light pressure. For any other questions, or if you need more help with this one, please reply here, or give us a call.