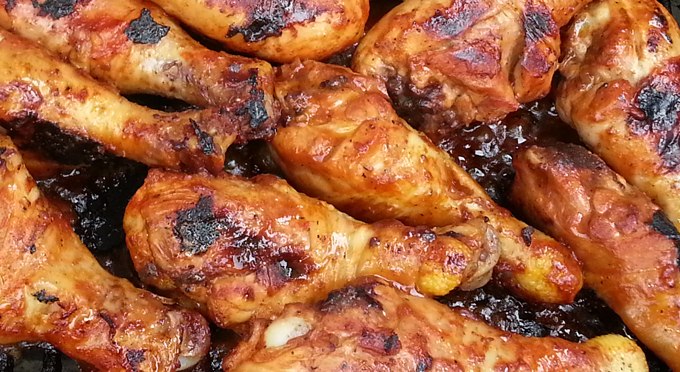
 There’s nothing that can spoil a perfect backyard gathering quicker than charred meat that glues itself to your grill. Don’t you just hate it when all that flavorful, sauce smothered skin sticks to the grate? It makes the chicken tear apart when you lift it off, it makes the sauce caramelize and burn, and because much of it will remain in place, it removes all of the delicious flavor that you were attempting to slow cook on there in the first place.
If you don’t want to sit there trying to explain away your incompetence, or if you’re sick of hiding the ruined side of each piece of chicken by placing perfectly onto the platter, then you’ll need to figure out how to prevent the meat from sticking in the first place. BBQ chicken and other sauce covered meats are notorious for getting stuck while cooking, but so are delicate fish fillets, kabobs and other foods.
There are a few go-to techniques that most people use to help prevent sticking when cooking stuff on the grill, and we will list those below. What follows will be a simply good way to prepare mouthwatering barbecue chicken without any worry that it will burn, or get stuck to the grate. As an added bonus, your food will look and taste better, and your grill will stay clean despite the use of ample amounts of gooey sauce.
Top Techniques To Prevent Sticking
1. Keep Your Grill Clean
A clean grill is a happy grill. It’s also one that releases food better. If your grate is all covered with black stuff, there is a good chance that things will bond to whatever that stuff is. If your grate looks shiny and new, you will have much less to worry about.
For a less frustrating grilling session, be sure to clean the grate before and after you cook. A wire brush works well for this job, and all of that yucky stuff will scrub off easier if you wait until the surface is hot. Give a quick brush in the direction of the grates to clear off cooked food, and reveal the metal underneath.
2. The Hotter The Better
You still need to pay attention to the food you’re cooking, and grill at the correct temperature for the bulk of the time, but making sure that it is fully heated before you put your meat down will help prevent sticking. Cold food placed onto a cold metal grate will always get stuck. Cold meat placed onto a hot surface is far less likely to bond with said surface. For the easiest grilling experience, go with room temperature meat, and a fully heated grilling surface.
3. Patience Is A Virtue
Flipping is fun. You know you love it, but it’s important to restrain yourself long enough so that you don’t ruin your food. If the meat is still raw and cold on the bottom, and you try to turn it over, it will almost certainly glue in place, and resist turning. If that same meat is allowed to cook just a little bit longer, it probably won’t stick at all.
To check your meat prior to flipping, gently lift up one edge, and peek underneath. If it does not look browned or cooked, then it will be more likely to stick to the grate when you try to turn it over. Once the meat is properly cooked on one side, it will be much easier to flip over without damage.
4. Oil It Up
Oddly enough, one way to prevent food from sticking, is to make the surface non-stick. Duh. If you add oil to the grilling surface, or to the food prior to placing it down, it can greatly reduce the risk of sticking.
You should avoid spray on solutions unless you like large flames bursting into your face, but brushing or smearing on some cooking oil seems to work well to prevent sticking. Completely cover the metal in order to season it, and over time you will never have to worry about stuck food.
Be careful to avoid touching hot surfaces with your bare hands, and lightly coat the metal. You can rub it on with a rag or paper towel, you can brush it on with a basting brush, or you can get creative, and skewer an onion half covered in olive oil to make your own tool that also delivers extra flavor.
5. Sauce It Up at the Right Time
To make things easy, you can apply the barbecue sauce to the chicken during the last 5-10 minutes of grilling. Barbecue sauce contains sugar, which can caramelize and stick to the grill if applied too early. Brush a thin layer of sauce onto the chicken, and be sure to watch it closely during this time to prevent burning. Plain chicken is way less likely to stick when compared to chicken with barbecue sauce on it, so if you wait to add it, you can avoid some of the difficulty without sacrificing flavor.
6. Grill With The Lid Off
Keep the grill lid open when applying barbecue sauce and during the final few minutes of cooking. This helps prevent the sauce from burning and sticking to the grill grates. If you cover your chicken in BBQ sauce, and then close the lid, the high heat can caramelize the sauce without any flame touching it. This will result in dark color, but also increased stickiness. When you keep the lid off, you can monitor closely, and keep the heat lower. The chicken will take longer to cook, but it will also turn out better.
7. Keep It Dry
When you place food on the grill wet, it’ll be way more likely to stick in place when you try to flip it. If you take the extra step of drying the surface of your food before you grill it, you will have a much easier time cooking it. Excess moisture on the surface of meat, vegetables, or seafood can lead to sticking. Pat your ingredients dry with paper towels before seasoning or oiling.
All of the above techniques will help to eliminate sticking when cooking regular food like hot dogs, hamburgers and steaks, but fish and saucy meats are still likely to glue, no matter how clean or oiled up your grate is. Use the technique below to fully eliminate any possibility of sticking, no matter what you have on the grill.
An Easy Way To Prevent Sticking on The Grill
Using one of our grill mats will ensure flavorful results, effortless cooking, simple clean up, and also food that doesn’t stick. You can use it any time you grill in order to protect the grate, improve flavor, and eliminate the need for extensive clean up afterward. Despite being a solid sheet, it allows for heat to transfer so effectively that you still get grill marks.
Because absolutely nothing sticks to the surface, you can slather on the sauce, grill delicate fillets, cook small vegetables and more while still achieving that great grilled taste and look. Once you’re finished cooking, they wash up easily, and are totally reusable.
To make mouth watering BBQ chicken that any guest or family member will enjoy, just follow the simple instructions below. We used a charcoal grill, but with a slightly modified technique, you could easily get the same results with your gas powered model.
1. Prepare The Meat
Way before you go outside to build a fire, you should get your chicken ready to go. In this case, we used only drumsticks, but you could use any other cut with the same method. Quality does play a role in the finished product, so we opted for organic meat, seasonings and a homemade sauce. You could go conventional, but improved taste is only one of many reasons to choose organic instead.
- All pieces were brought to room temperature, patted dry, and placed into a container with a lid.
- The skin was left on, and each piece was coated with plenty of sea salt, fresh ground pepper and garlic powder.
- Once the dry rub was in place, we poured loads of barbecue sauce over the top of the chicken.
- Once the sauce was on, we stirred everything around to ensure the meat was fully covered.
- It was then left to sit and marinate. You could do this for a couple hours or overnight.
- The longer you let the chicken sit in the barbecue sauce, the more flavor it will absorb. To speed things up, you might want to try our instant marinater to flavor your meat in less than five minutes.
 2. Prepare Your Grill
Step two is to set up your grill. Because we will be slow cooking at a lower temperature, you’ll want to arrange your coals in a certain way to allow for indirect heating. If cooking on a gas grill, just turn the knob to low, or use select burners only.
- Start your fire like you normally do.
- Allow coals to gray, or gas burners to heat fully.
- Once your fire is ready, prepare for cooking by separating the coals so that they are only on the sides, and the center is clear. For gas units, just turn to low, or cut off one or more burners.
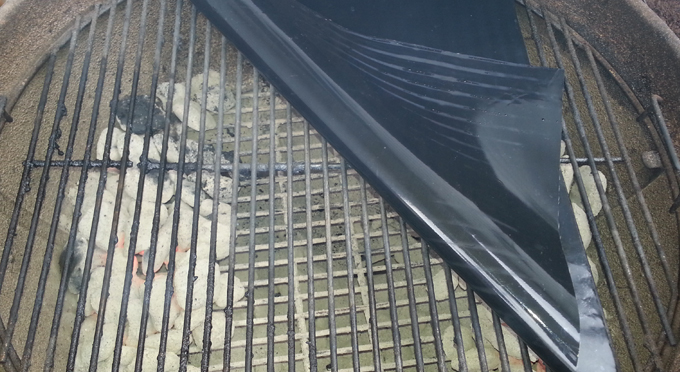
- Secure the grate in place, then put a grill mat directly on top.
- For smaller grills, you can cut the mat to fit, and for larger ones, you can use more than one mat.
- For charcoal grills, slightly close the bottom vent to help keep the temp low.
- For gas grills, ensure your burners are set at a medium, or medium-low setting.
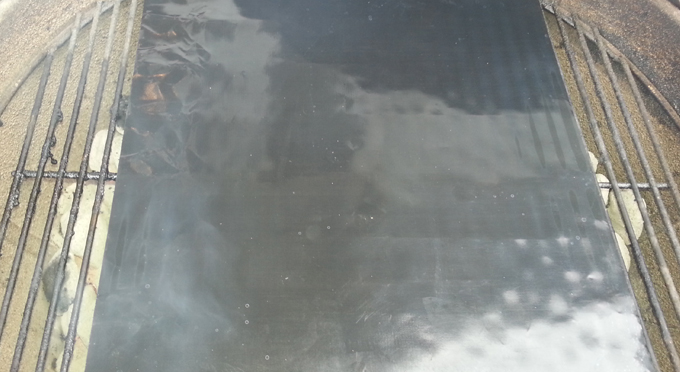
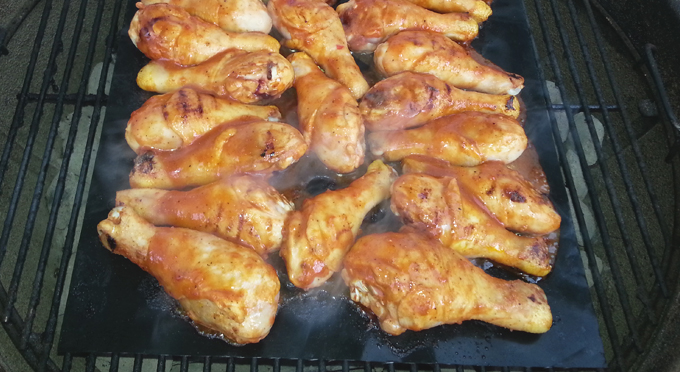
- Once the mat is in place, allow it time to pre-heat. Your barbecue should look similar to the photo below.
3. Drop It Like It’s Hot
Once you’re all set up, and you’ve given the fire time to pre-heat the grill, it’ll be time to drop your chicken down onto the hot surface.
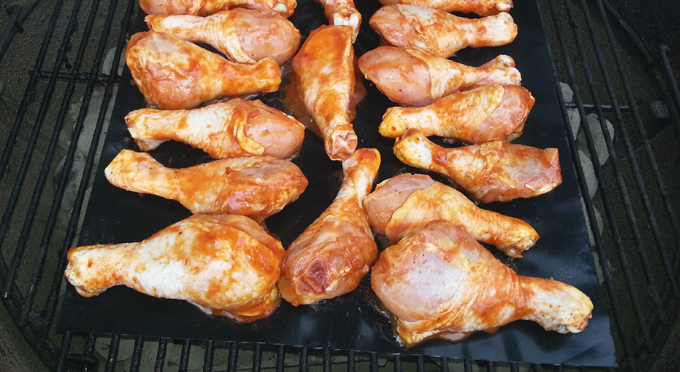
- Use your bare hands, or use a pair of tongs to arrange the pieces on the mat. Be careful, it’s hot.
- Space them out evenly, and be sure that all parts are touching the mat, and not the grate.
- Once on the mat, use a basting brush to take leftover sauce from the container, and brush it on top of each piece.
- After covering with sauce, close the lid on your barbecue to let them cook.
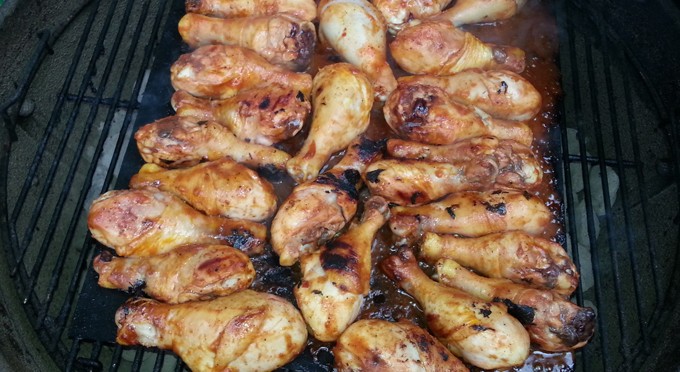
4. Regular Check-Ups
You will need to keep the lid closed as much as possible so heat remains inside, but you’ll also need to check the chicken to add more sauce, and flip each piece occasionally. When doing so, be as quick as possible in order to ensure good results. Check out the picture above to see the chicken in process. Notice the grill lines that form, right through the mat!
- Turn each piece as needed, and then re-position.
- If you notice that one side of the grill is hotter than the other, rotate chicken to make sure each piece cooks evenly, and at the same rate as the others.
- Once you have flipped and moved, add more sauce to cover each piece, then re-cover the grill to continue cooking.
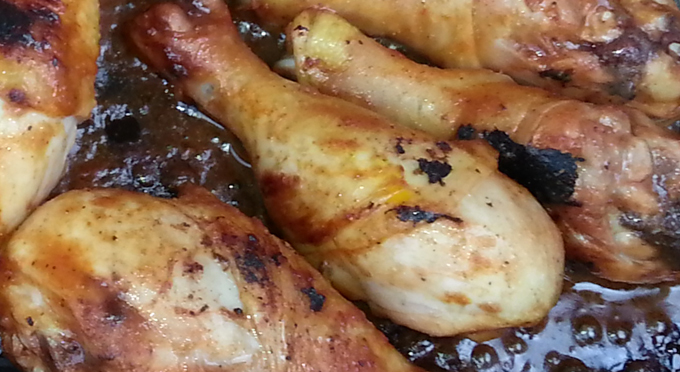 While cooking, don’t be afraid to add as much sauce as you like. Unlike normal conditions that would have it drip down to ruin your grill, or put out the fire, the mat holds it all under the meat in order to cook in flavor. It won’t burn onto the chicken, and any that chars on the surface of the mat will wipe right off after you finish.
Thanks to this improved cooking surface, you get chicken that is more moist, more flavorful, and way easier to cook. You will not give up any of the flavor or browning you are used to, but you will avoid drumsticks that are stuck in place, or breasts that have burnt sauce on the outside and under-cooked meat on the inside.
5. One More Time
The more frequently you baste, the more BBQ flavor you will enjoy. Because you’re using leftover sauce from marinating, you’ll want to discontinue basting before the chicken is done, so any yucky stuff from the raw meat has time to cook off.
 You should check the meat every 5-10 minutes, but exact cooking time will depend on exact temperature, proximity to the heat source, amount of flipping, ambient temps, type of grill and much more.
Essentially, you’ll want to keep checking it and basting until it feels done. Raw chicken feels squishy when you poke it, and it will firm up and brown as it finishes. When you think you are on your last 5-10 minute session, give each piece one last coating of sauce, and then cover until finished.
6. You’re Done
It’s so easy. After another little bit, your chicken will be perfectly grilled, and there won’t be one piece stuck to the grate, or glued in place due to the sticky sauce. Because you were able to cook it with an improved method, the inside will be tender and juicy, and the outside will be nicely crispy.
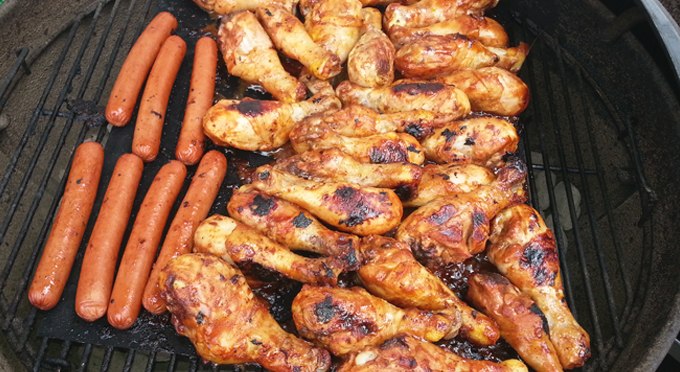 Thanks to the fact that it cooked in sauce as you slathered sauce over the top, you will taste intense BBQ flavor with each and every bite. In our case, we scooted all of the drumsticks to the side at the last minute in order to heat up some hot dogs for the kids. All of the sauce that was covering the mat, wiped off easily in order to provide a clean, sauce-free surface for the dogs, so no there was no complaining afterward.
Our BBQ Grill mats are easily adaptable to any type of food, and you can easily cook more than one type, all at the same time. It doesn’t matter what you put on top because it will never stick, and your grill will always be protected. A simple mat will eliminate messy clean up, allow you to enjoy a greater variety of grilled foods, and eliminate the annoyance of destroyed meat that gets stuck to the metal.
Added Benefits
Non-stick grill mats are perfect for saucy meats like BBQ Chicken, but you can use them for other stuff too. Easily grill any type of fish without trouble, no matter how delicate or flaky it is. Cook vegetables for added nutrition, or grill some potato slices for the perfect side.
You can saute shrimp along side a nice steak, or you can cook shish kabobs without worry about rotating them, or loosing pieces through the grate. Take one camping to cook eggs, bacon and pancakes at breakfast time, or use one in your kitchen to prevent cookies from sticking to the pan while baking. It makes the perfect drip mat for inside your oven, and can even act as a splatter guard in your microwave.
Get one of these mats to solve the problem of BBQ chicken that sticks to your grill, but then continue using it for all sorts of other stuff too. It’ll be guaranteed to improve your cooking experience, and because they are totally washable and reusable, they make economic sense when compared to other options too.
Homemade BBQ Sauce Recipe
You can always use a bottle you buy from the store, but when you make your own sauce, you can cater to your exact tastes. Every store-bought sauce or homemade version will have sugar, honey or molasses as an ingredient, so they will all cause meat to stick when you marinate with it, but when you make your own, you can create the perfect flavor, and use high quality ingredients.
Making homemade barbecue sauce is a flavorful and satisfying way to enhance your grilled dishes. Here’s a basic homemade BBQ sauce recipe that you can customize to suit your taste preferences:
Ingredients:
- 1 cup ketchup
- 1/2 cup brown sugar (adjust to taste)
- 1/4 cup apple cider vinegar
- 2 tablespoons Worcestershire sauce
- 2 tablespoons molasses
- 1 teaspoon smoked paprika (or regular paprika for a milder flavor)
- 1 teaspoon garlic powder
- 1 teaspoon onion powder
- 1/2 teaspoon black pepper (adjust to taste)
- 1/2 teaspoon salt (adjust to taste)
- 1/2 teaspoon chili powder (adjust to taste for heat)
- Optional: 1/4 teaspoon cayenne pepper for extra heat (adjust to taste)
- Optional: 1-2 tablespoons of hot sauce for added spiciness (adjust to taste)
- Optional: 1-2 tablespoons Dijon mustard for tanginess (adjust to taste)
Instructions:
- Combine Ingredients: In a medium saucepan, combine all the ingredients: ketchup, brown sugar, apple cider vinegar, Worcestershire sauce, molasses, smoked paprika, garlic powder, onion powder, black pepper, salt, chili powder, and cayenne pepper (if using). Stir well to combine.
- Simmer and Stir: Place the saucepan over medium heat and bring the mixture to a gentle simmer. Reduce the heat to low and let it simmer for about 10-15 minutes, stirring frequently. This helps meld the flavors and thicken the sauce.
- Taste and Adjust: Taste the barbecue sauce and adjust the seasoning to your liking. If you prefer a sweeter sauce, add more brown sugar. For more tanginess, add a bit more vinegar. Adjust the heat level with chili powder, cayenne pepper, or hot sauce. You can also add Dijon mustard for extra tang if desired.
- Cool and Store: Remove the saucepan from heat and let the barbecue sauce cool to room temperature. It will thicken slightly as it cools. You can store it in an airtight container in the refrigerator for up to a few weeks.
- Use: Use your homemade barbecue sauce as a marinade, basting sauce, or dipping sauce for grilled meats, poultry, seafood, vegetables, or even as a condiment for burgers and sandwiches.
Feel free to adjust the ingredients and seasonings to match your taste preferences. Homemade BBQ sauce is highly customizable, so you can experiment with different flavors until you find your perfect combination. Enjoy your homemade sauce with your favorite grilled dishes!


 Ordering Info
 Customer Service
 Follow Us
 Search For Stuff
 Find Us
 Call Us
 Pay Us
0 Comments so far.
Use the form below to add your own thoughts or questions. Scroll down to read what other people had to say.